> ## Documentation Index
> Fetch the complete documentation index at: https://omer-914cc1c6.mintlify.site/llms.txt
> Use this file to discover all available pages before exploring further.

# AWS Route 53 与 CloudFront

> 使用 AWS 服务在自定义子路径下托管文档

要使用 AWS Route 53 和 CloudFront 将文档托管在自定义子路径（例如 `yoursite.com/docs`），你需要在 DNS（域名系统）提供商处配置记录指向你的 CloudFront 分配（Distribution）。

<div id="repository-structure">
  ## 存储库结构
</div>

为匹配所选的子路径结构，你需要在存储库中组织文档文件。比如，如果你希望文档位于 `yoursite.com/docs`，应创建一个包含所有文档文件的 `docs/` 目录。

<div id="high-level-overview">
  ## 概览（高层）
</div>

将流量路由到以下路径，并将缓存策略设置为 **CachingDisabled**：

* `/.well-known/acme-challenge/*` - 用于 Let's Encrypt 证书验证（必需）
* `/.well-known/vercel/*` - 用于 domain 验证（必需）
* `/docs/*` - 用于子路径路由（必需）
* `/docs/` - 用于子路径路由（必需）

将流量路由到以下路径，并将缓存策略设置为 **CachingEnabled**：

* `/mintlify-assets/_next/static/*`
* `Default (*)` - 你的网站着陆页

所有 Behaviors 的 **origin request policy** 必须为 `AllViewerExceptHostHeader`。
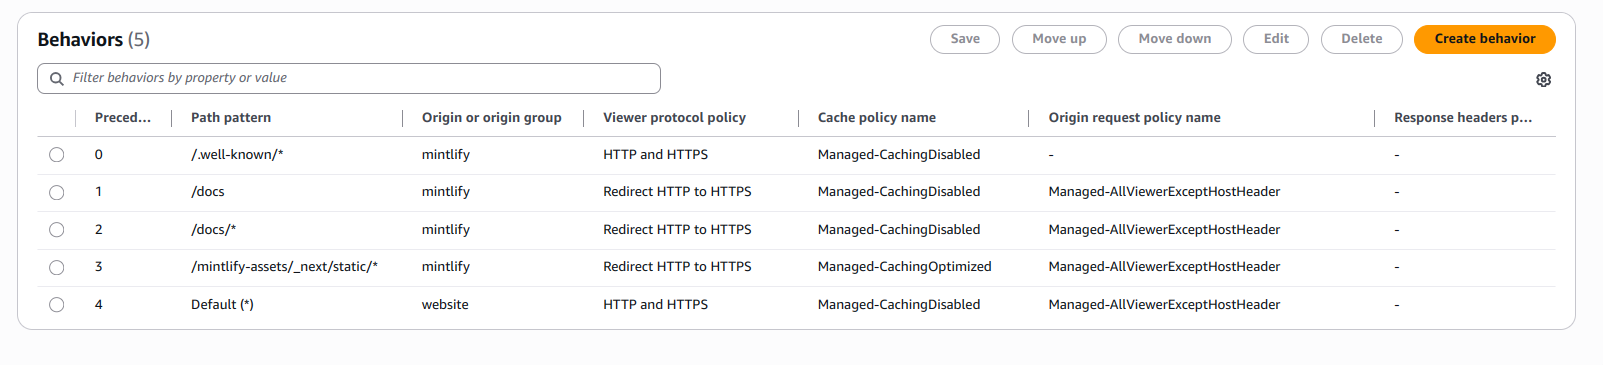
<img src="https://mintcdn.com/omer-914cc1c6/AiL60EGGBeap42Y0/images/cloudfront/all-behaviors.png?fit=max&auto=format&n=AiL60EGGBeap42Y0&q=85&s=e28ca7f1a2e94eeb8eed62f6ae5c1d53" alt="CloudFront “Behaviors” 页面包含 4 个行为：/docs/*、/docs、Default 和 /.well-known/*。" width="1603" height="365" data-path="images/cloudfront/all-behaviors.png" />

<div id="create-cloudfront-distribution">
  ## 创建 CloudFront 分配
</div>

1. 在 AWS 控制台中进入 [CloudFront](https://aws.amazon.com/cloudfront)。
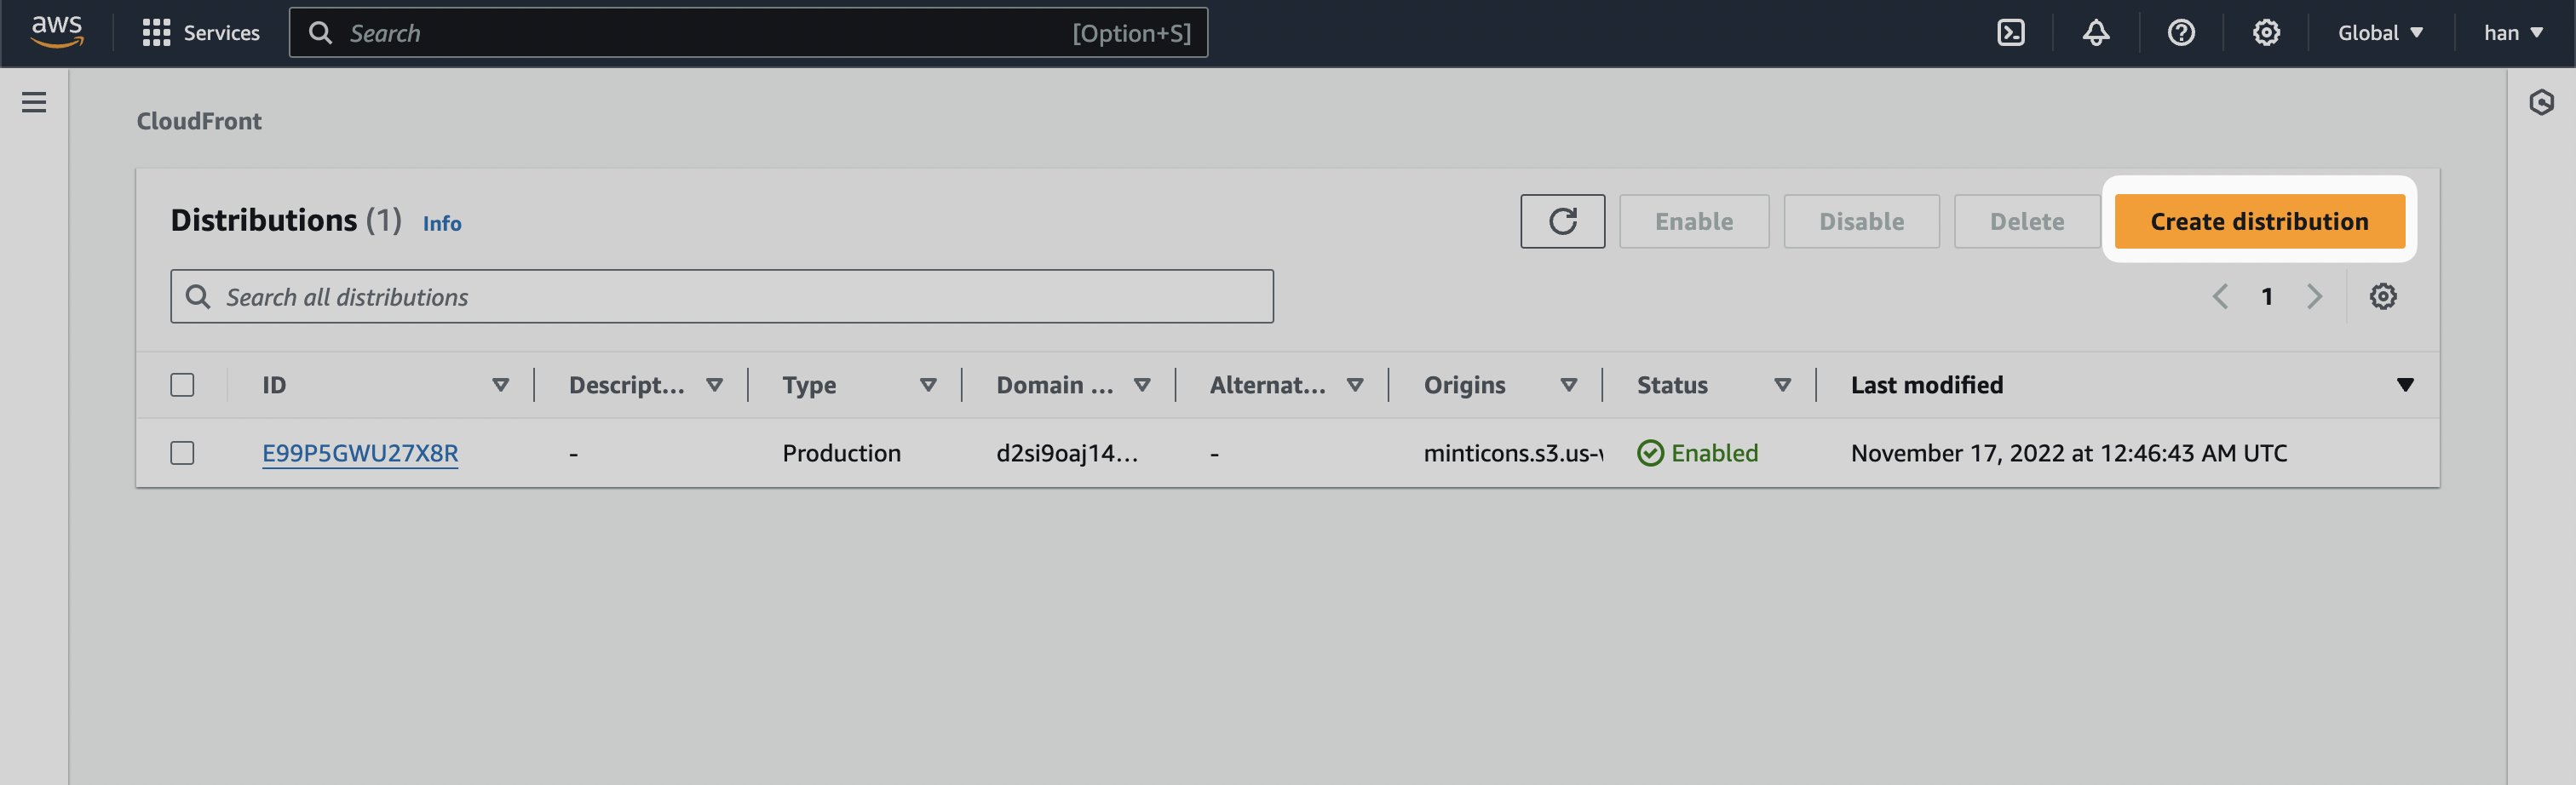
2. 选择 **Create distribution**。
<Frame>
  <img src="https://mintcdn.com/omer-914cc1c6/AiL60EGGBeap42Y0/images/cloudfront/create-distribution.png?fit=max&auto=format&n=AiL60EGGBeap42Y0&q=85&s=b5b53c3c979475c73f2e0de9ec67e745" alt="CloudFront Distributions 页面，突出显示“Create distribution”按钮。" width="3024" height="922" data-path="images/cloudfront/create-distribution.png" />
</Frame>

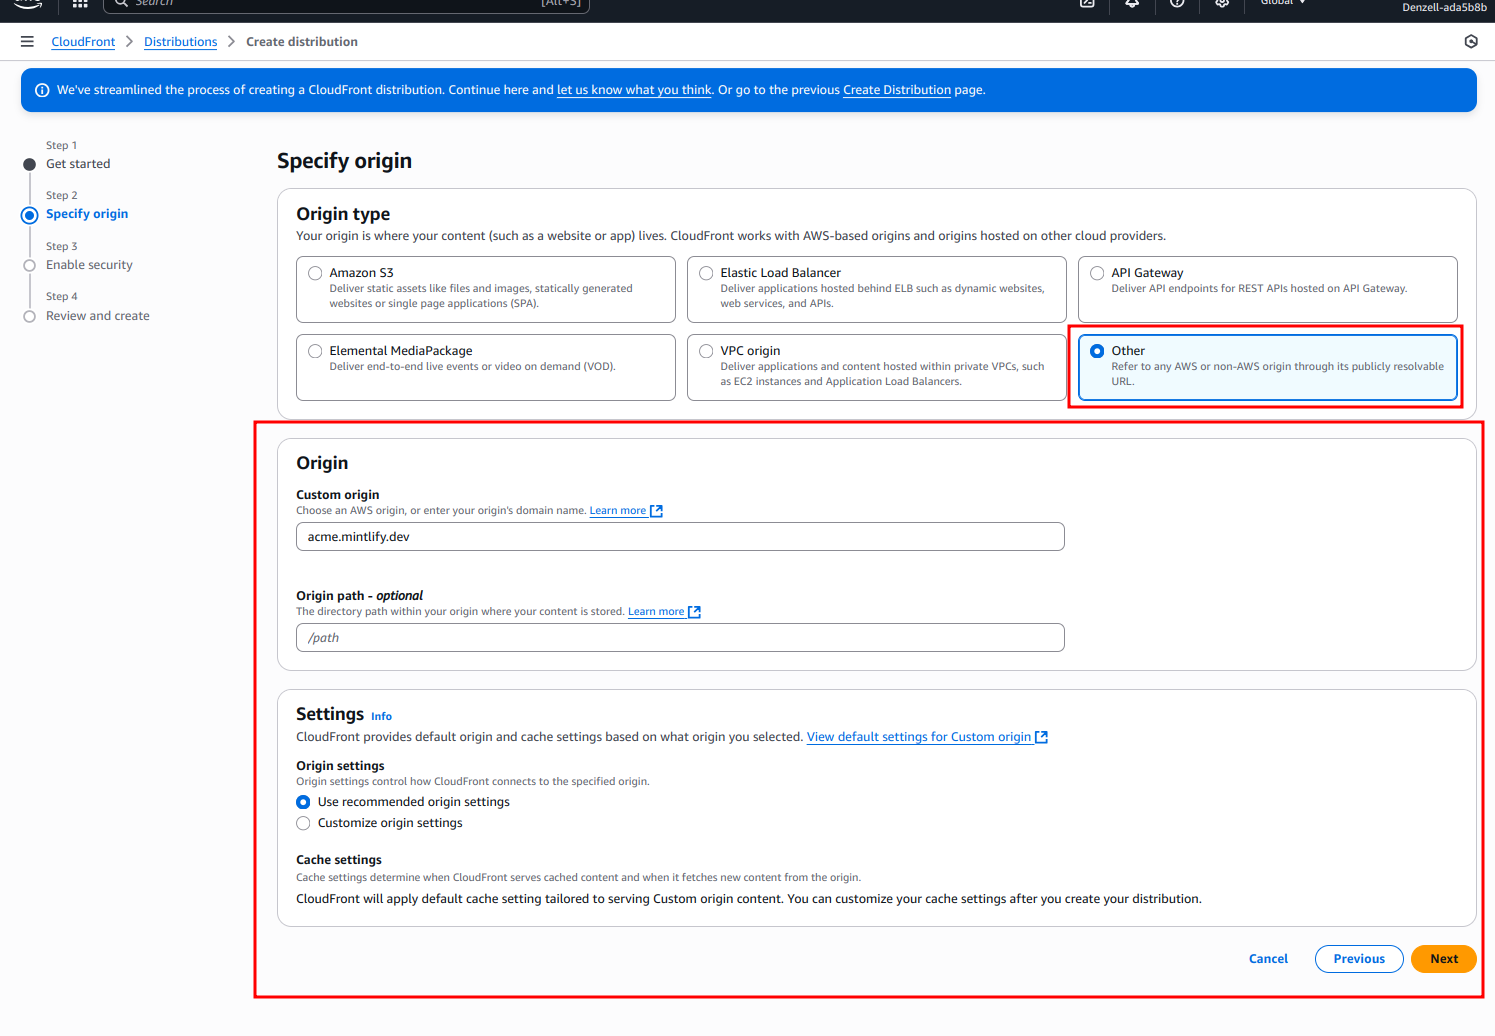
3. 在 Origin domain 中输入 `[SUBDOMAIN].mintlify.dev`，其中 `[SUBDOMAIN]` 是你项目的唯一子域。

<Frame>
  <img src="https://mintcdn.com/omer-914cc1c6/AiL60EGGBeap42Y0/images/cloudfront/origin-name.png?fit=max&auto=format&n=AiL60EGGBeap42Y0&q=85&s=d42ce75a7d38718d48e03d60a07b7d43" alt="CloudFront “Create distribution” 页面，显示 “acme.mintlify.dev” 作为 origin domain。" width="1495" height="1036" data-path="images/cloudfront/origin-name.png" />
</Frame>

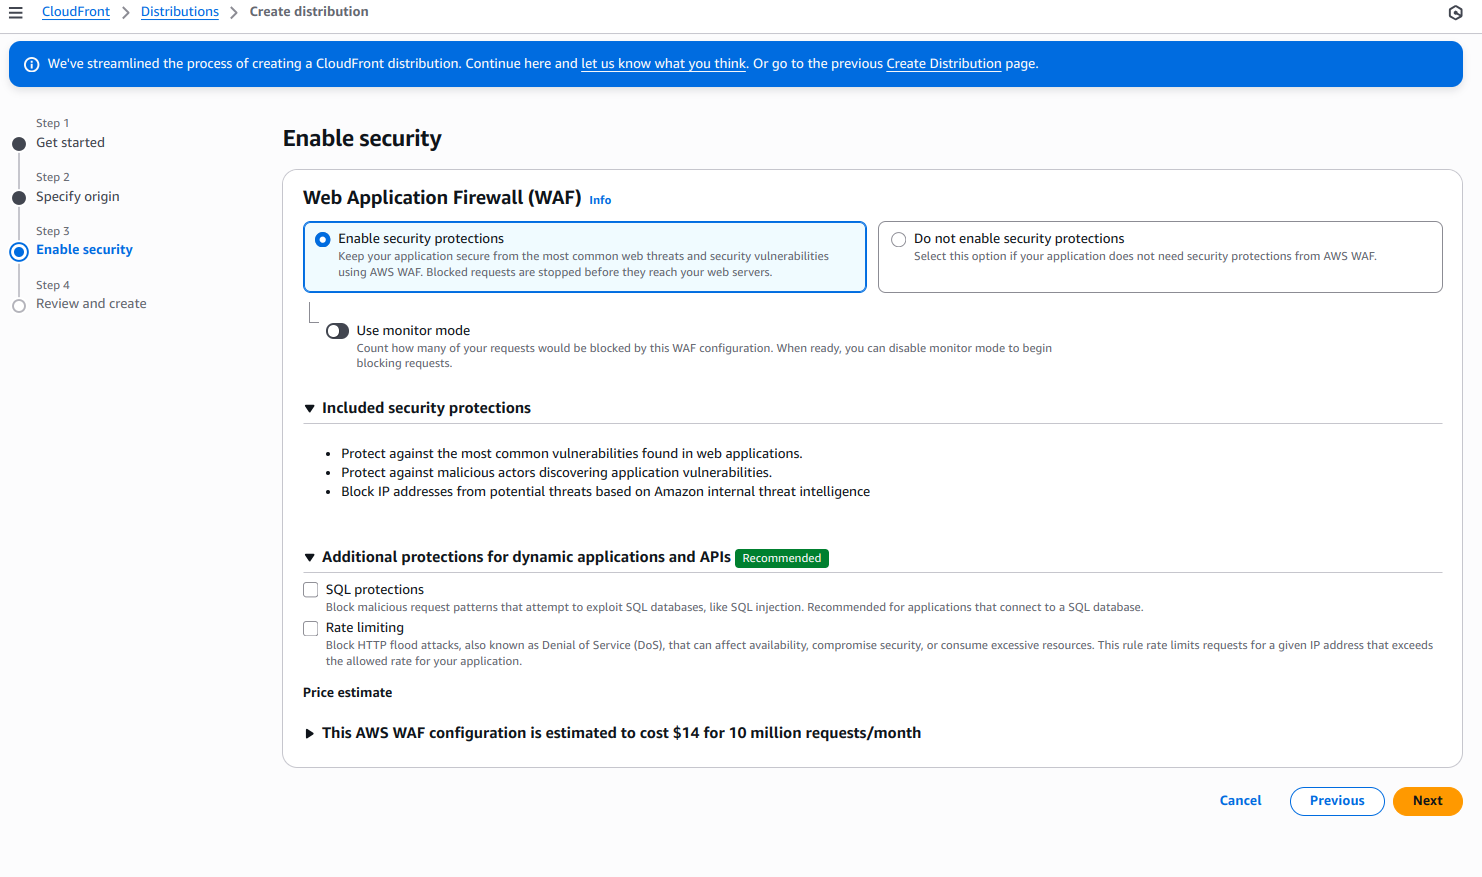
4. 在 “Web Application Firewall (WAF)” 中，启用安全防护。

<Frame>
  <img src="https://mintcdn.com/omer-914cc1c6/AiL60EGGBeap42Y0/images/cloudfront/enable-security-protections.png?fit=max&auto=format&n=AiL60EGGBeap42Y0&q=85&s=ab3cb2f88e7105cf5dc046054559690d" alt="Web Application Firewall (WAF) 选项，已选择 “Enable security protections”。" width="1482" height="877" data-path="images/cloudfront/enable-security-protections.png" />
</Frame>

5. 其余设置保持默认。
6. 选择 **Create distribution**。

<div id="add-default-origin">
  ## 添加默认 Origin
</div>

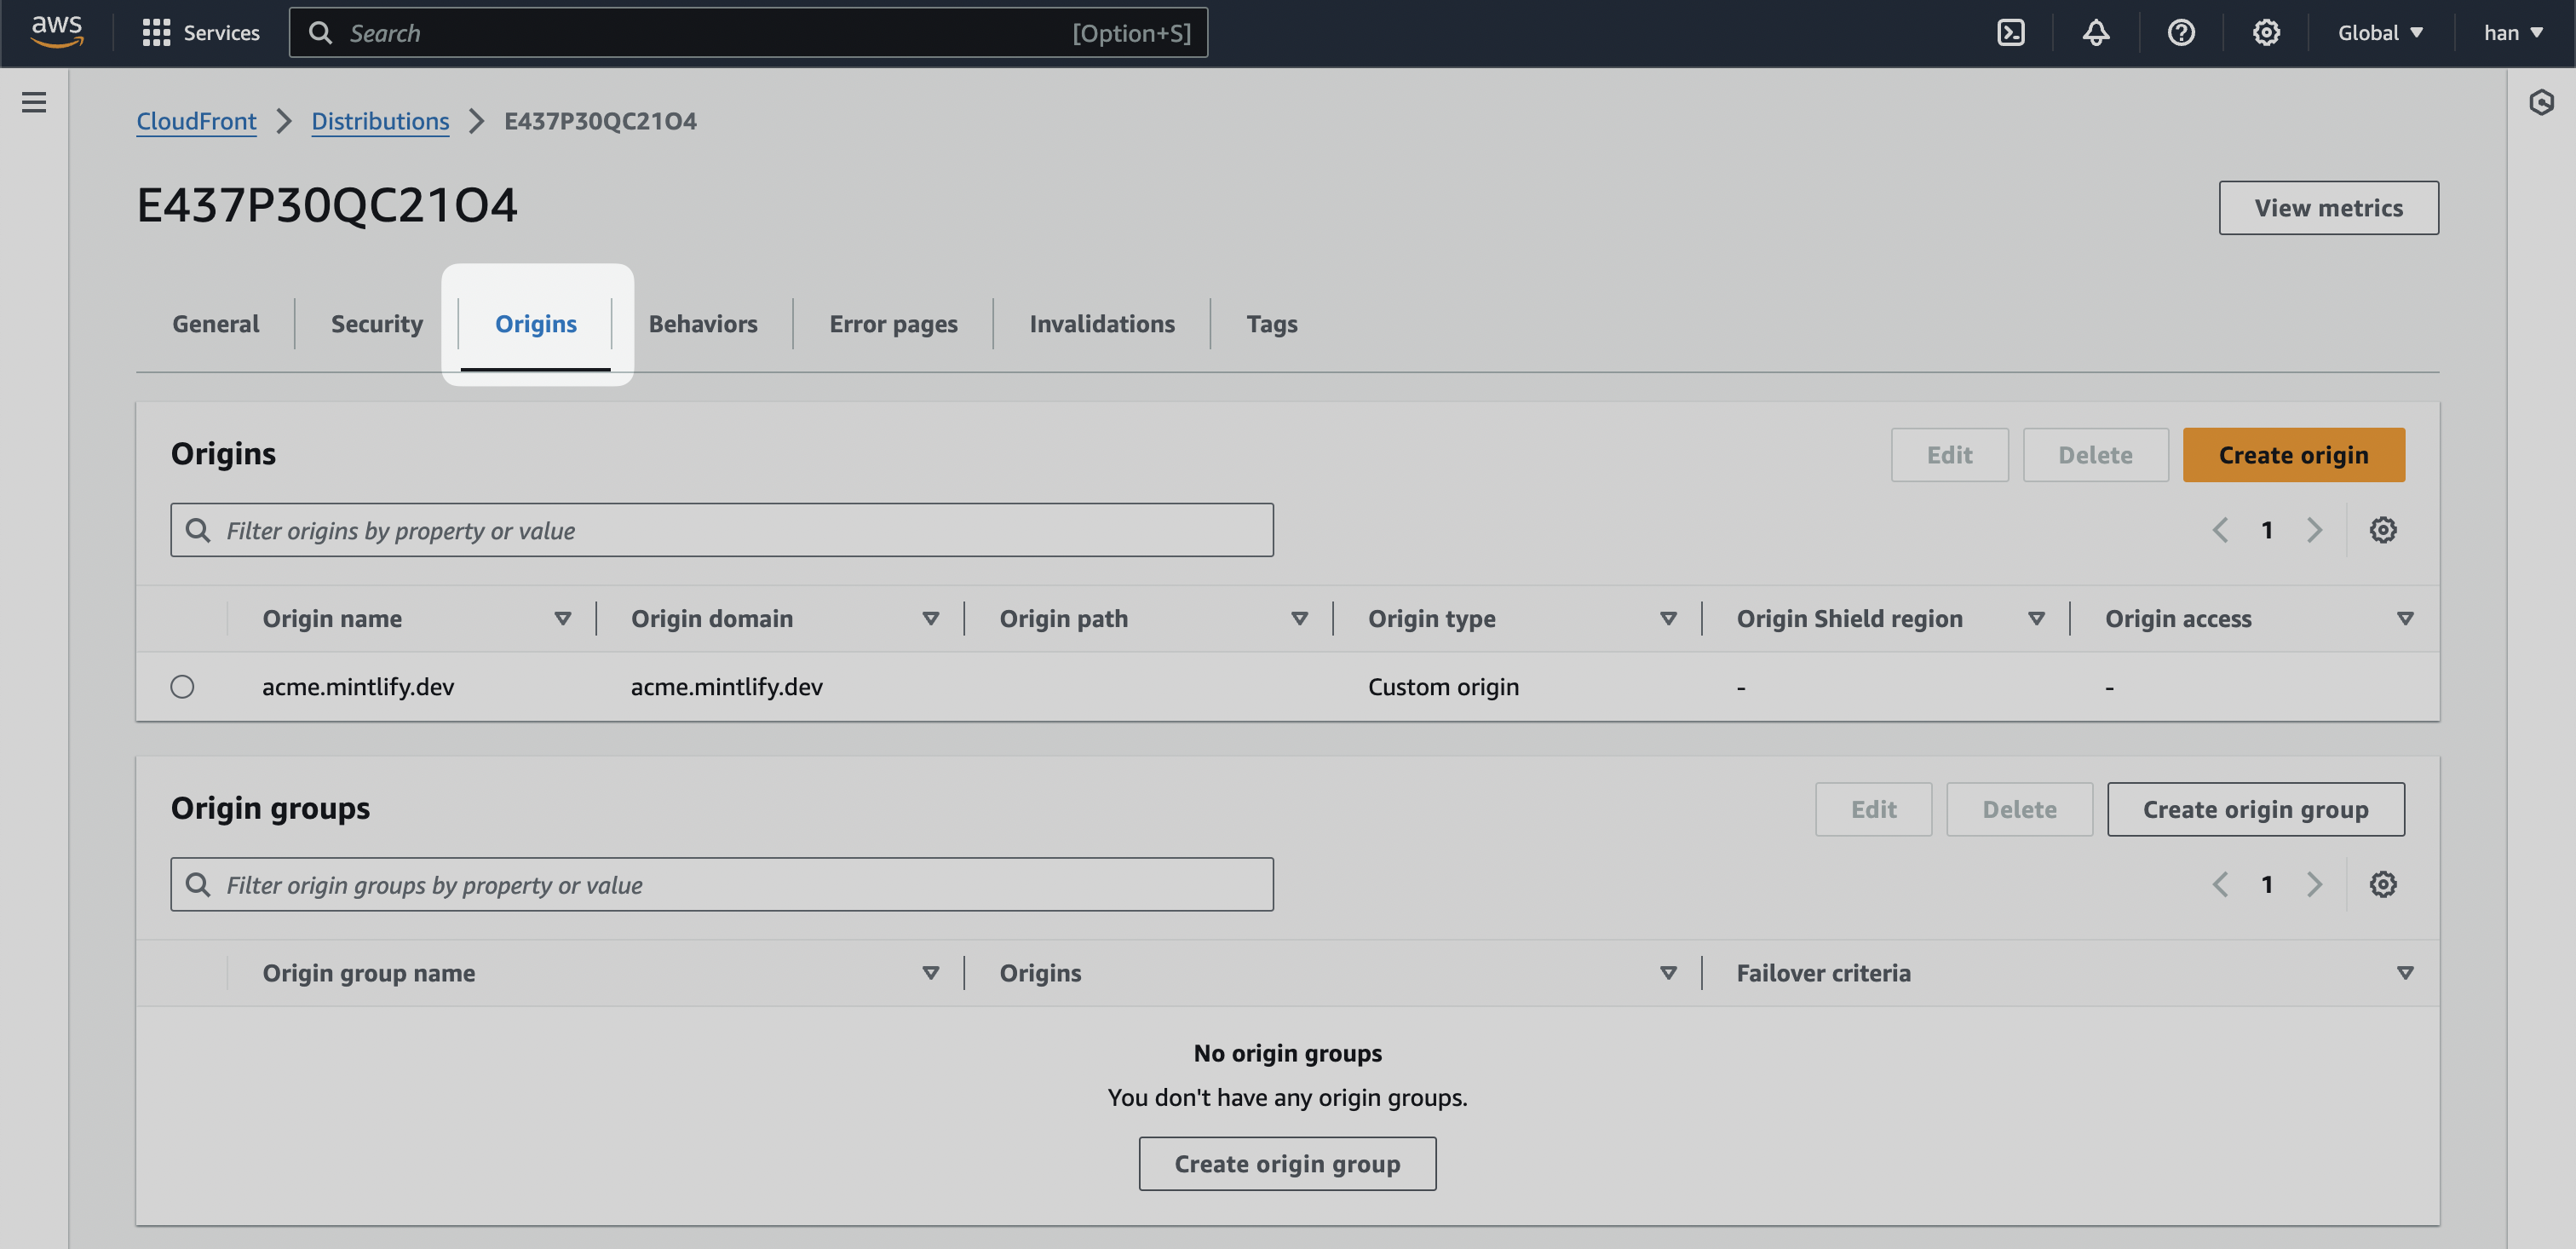
1. 创建分发后，前往 “Origins” 标签页。

<Frame>
  <img src="https://mintcdn.com/omer-914cc1c6/AiL60EGGBeap42Y0/images/cloudfront/origins.png?fit=max&auto=format&n=AiL60EGGBeap42Y0&q=85&s=930736017fe33d5aeaa65d17ff209dcf" alt="一个 CloudFront 分发，已高亮显示 “Origins” 标签页。" width="3024" height="1466" data-path="images/cloudfront/origins.png" />
</Frame>

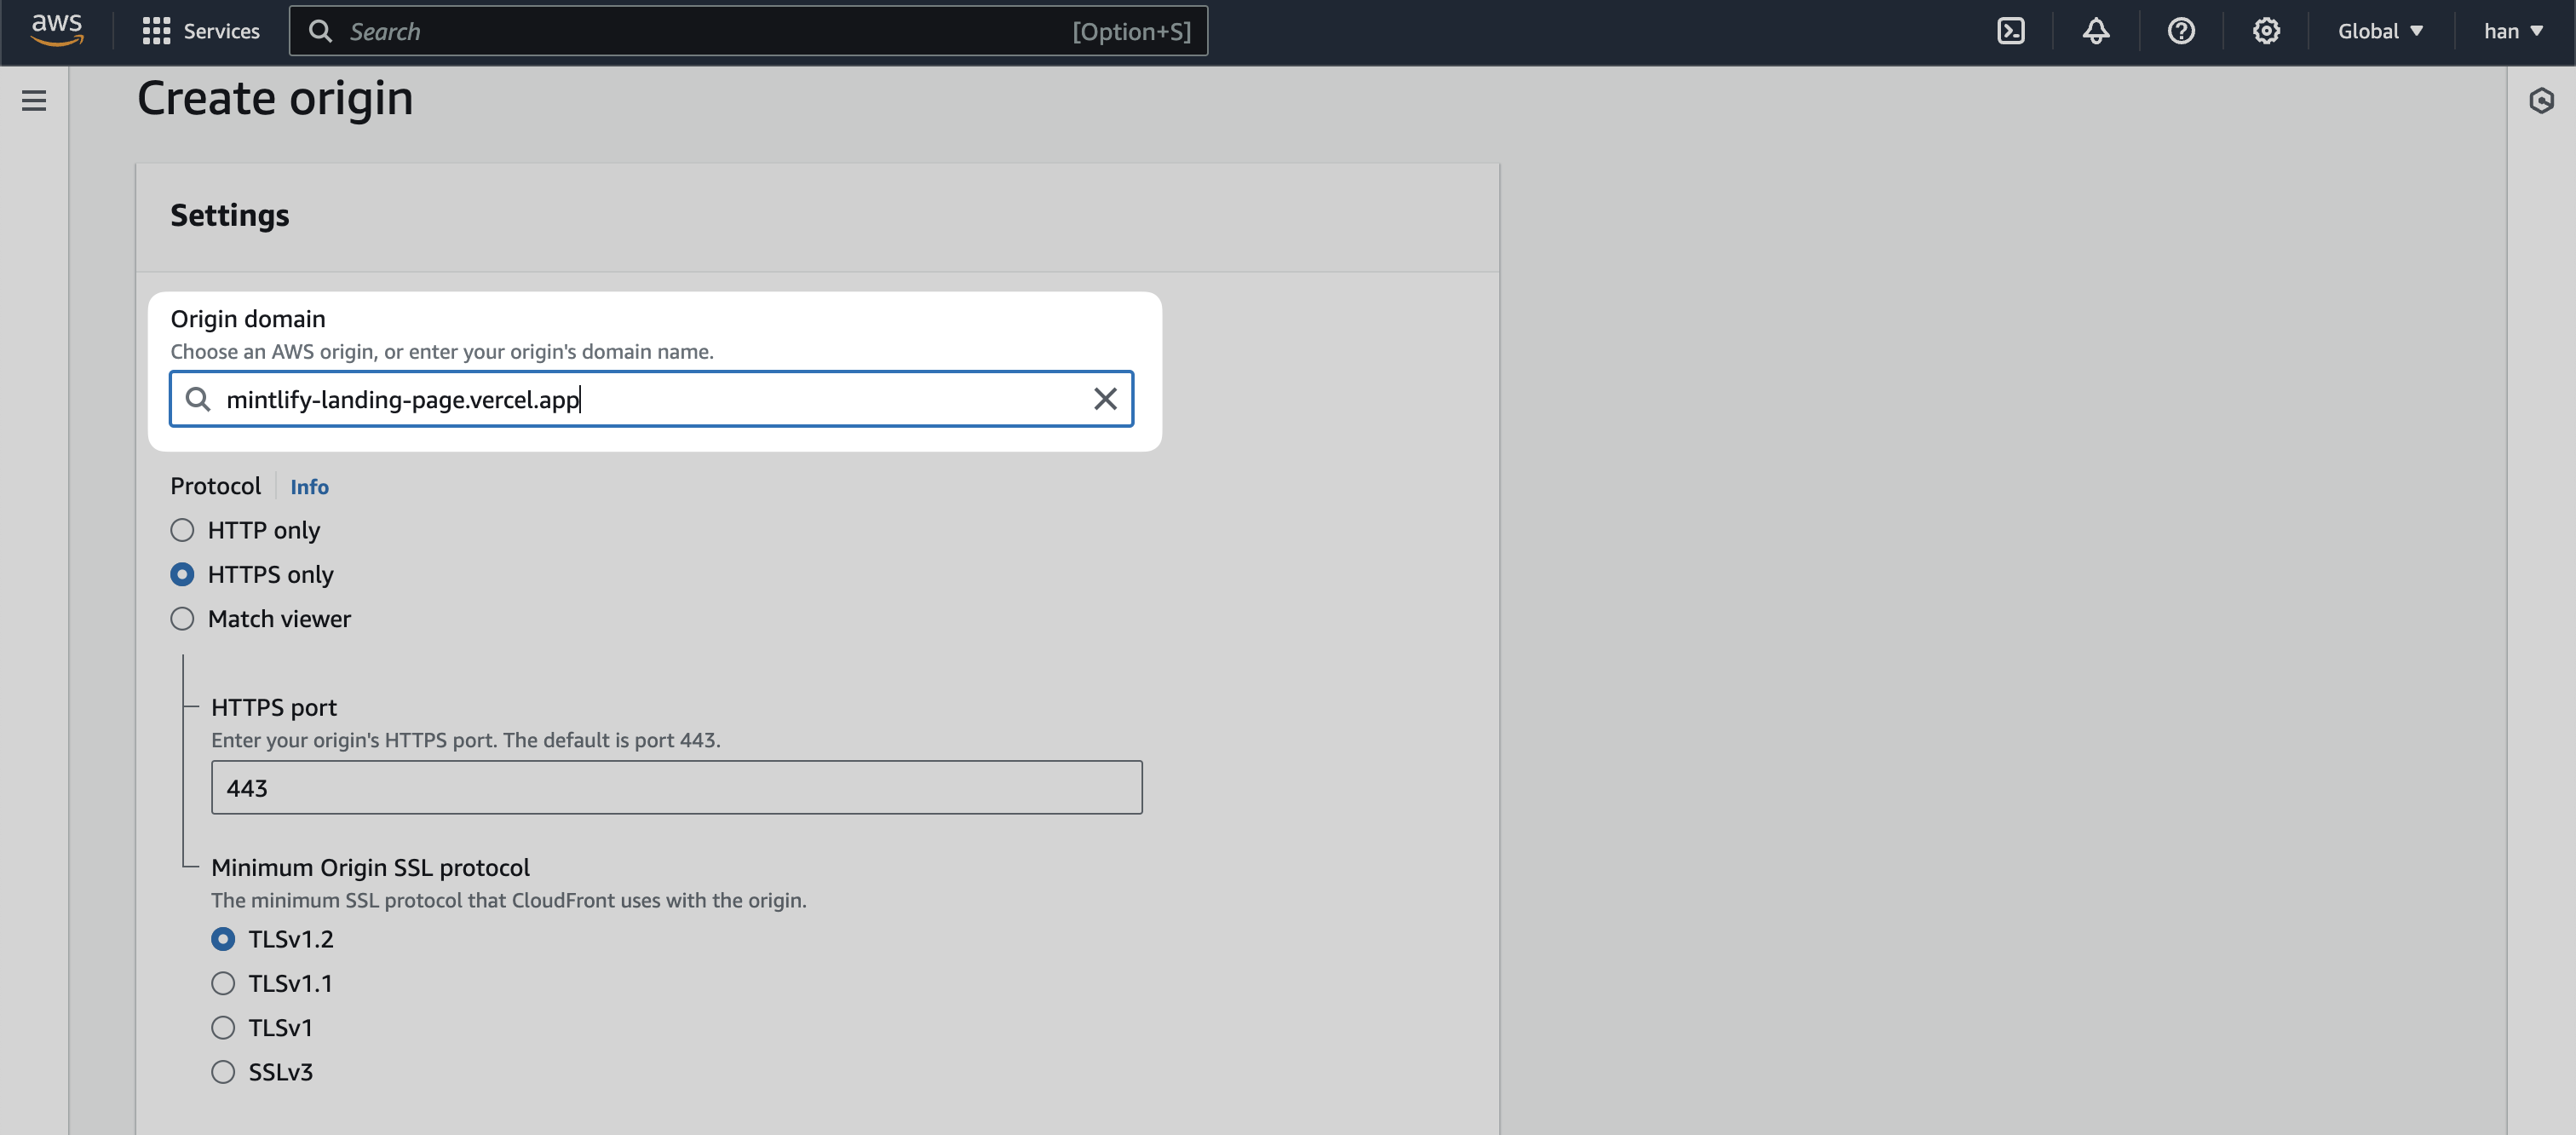
2. 找到与你主域名对应的预发布环境 URL。具体取决于落地页的托管方式，可能差异较大。例如，Mintlify 的预发布 URL 是 [mintlify-landing-page.vercel.app](https://mintlify-landing-page.vercel.app)。

<Info>
  如果你的落地页托管在 Webflow，请使用 Webflow 的预发布 URL，通常以 `.webflow.io` 结尾。

  如果你使用 Vercel，请使用每个项目都会提供的 `.vercel.app` 域名。
</Info>

3. 新建一个 Origin，并将你的预发布 URL 填入 “Origin domain”。

<Frame>
  <img src="https://mintcdn.com/omer-914cc1c6/AiL60EGGBeap42Y0/images/cloudfront/default-origin.png?fit=max&auto=format&n=AiL60EGGBeap42Y0&q=85&s=4b496468140f03fd98b743180e716f7e" alt="CloudFront 的 “Create origin” 页面，已高亮显示 “Origin domain” 输入框。" width="3024" height="1332" data-path="images/cloudfront/default-origin.png" />
</Frame>

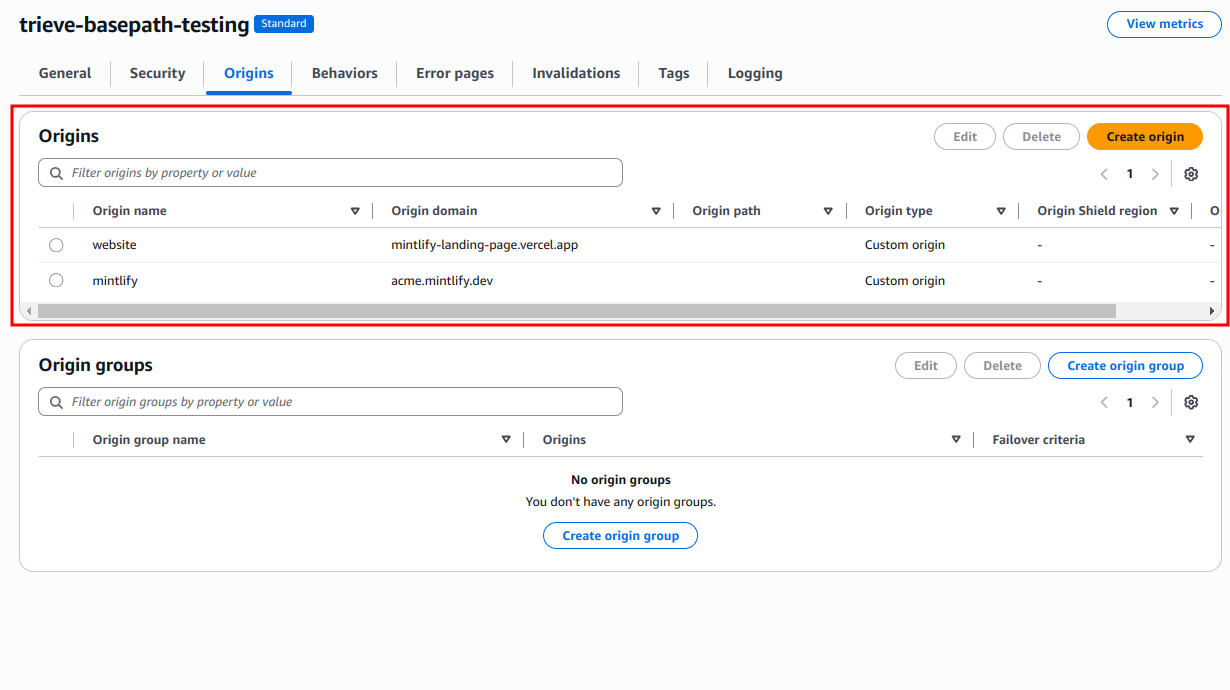
此时，你应当有两个 Origin：一个是 `[SUBDOMAIN].mintlify.app`，另一个是你的预发布 URL。

<Frame>
  <img src="https://mintcdn.com/omer-914cc1c6/AiL60EGGBeap42Y0/images/cloudfront/final-origins.png?fit=max&auto=format&n=AiL60EGGBeap42Y0&q=85&s=0ffc5d54eb6f3a0a936b6e8e46870326" alt="CloudFront 的 “Origins” 页面包含两个 Origin：一个用于 mintlify，另一个用于 mintlify-landing-page。" width="1230" height="690" data-path="images/cloudfront/final-origins.png" />
</Frame>

<div id="set-behaviors">
  ## 设置行为
</div>

CloudFront 的行为用于控制子路径逻辑。总体上，我们希望实现以下逻辑：

* **如果用户访问你的自定义子路径**，跳转到 `[SUBDOMAIN].mintlify.dev`。
* **如果用户访问其他任意页面**，跳转到当前着陆页。

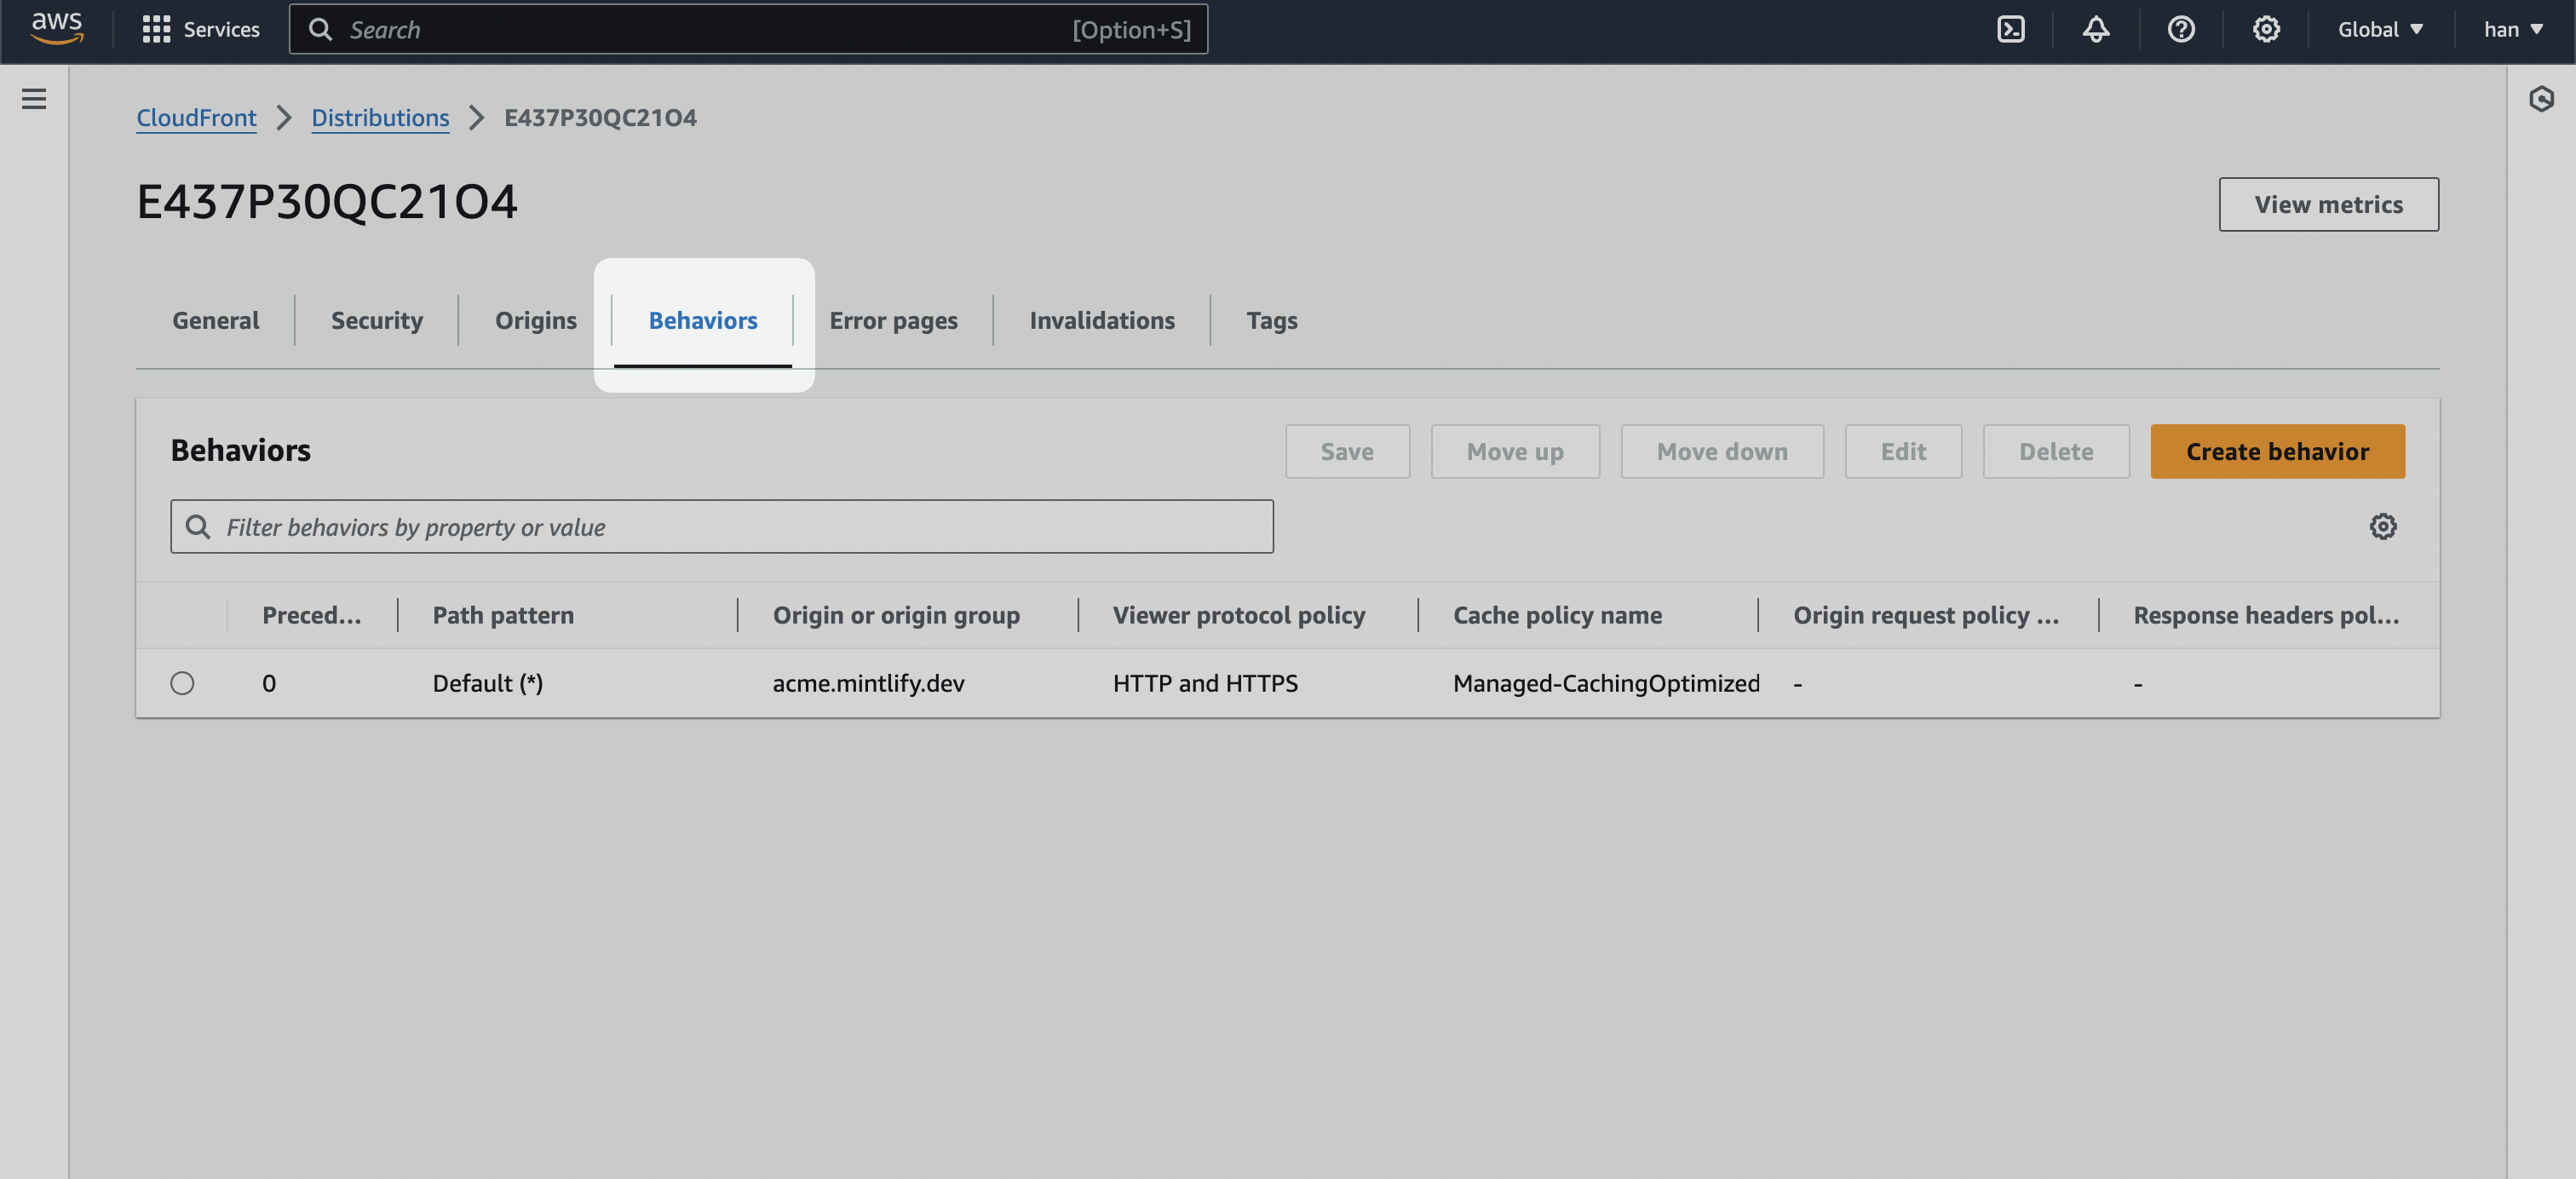
1. 前往 CloudFront 分配的 "Behaviors" 标签页。
<Frame>
  <img src="https://mintcdn.com/omer-914cc1c6/AiL60EGGBeap42Y0/images/cloudfront/behaviors.png?fit=max&auto=format&n=AiL60EGGBeap42Y0&q=85&s=d561cd9f02eceb65818f32b992cb5f9d" alt="CloudFront 的 &#x22;Behaviors&#x22; 标签页（已高亮）。" width="3024" height="1384" data-path="images/cloudfront/behaviors.png" />
</Frame>

2. 点击 **Create behavior** 按钮，并创建如下行为。

<div id="well-known">
  ### `/.well-known/*`
</div>

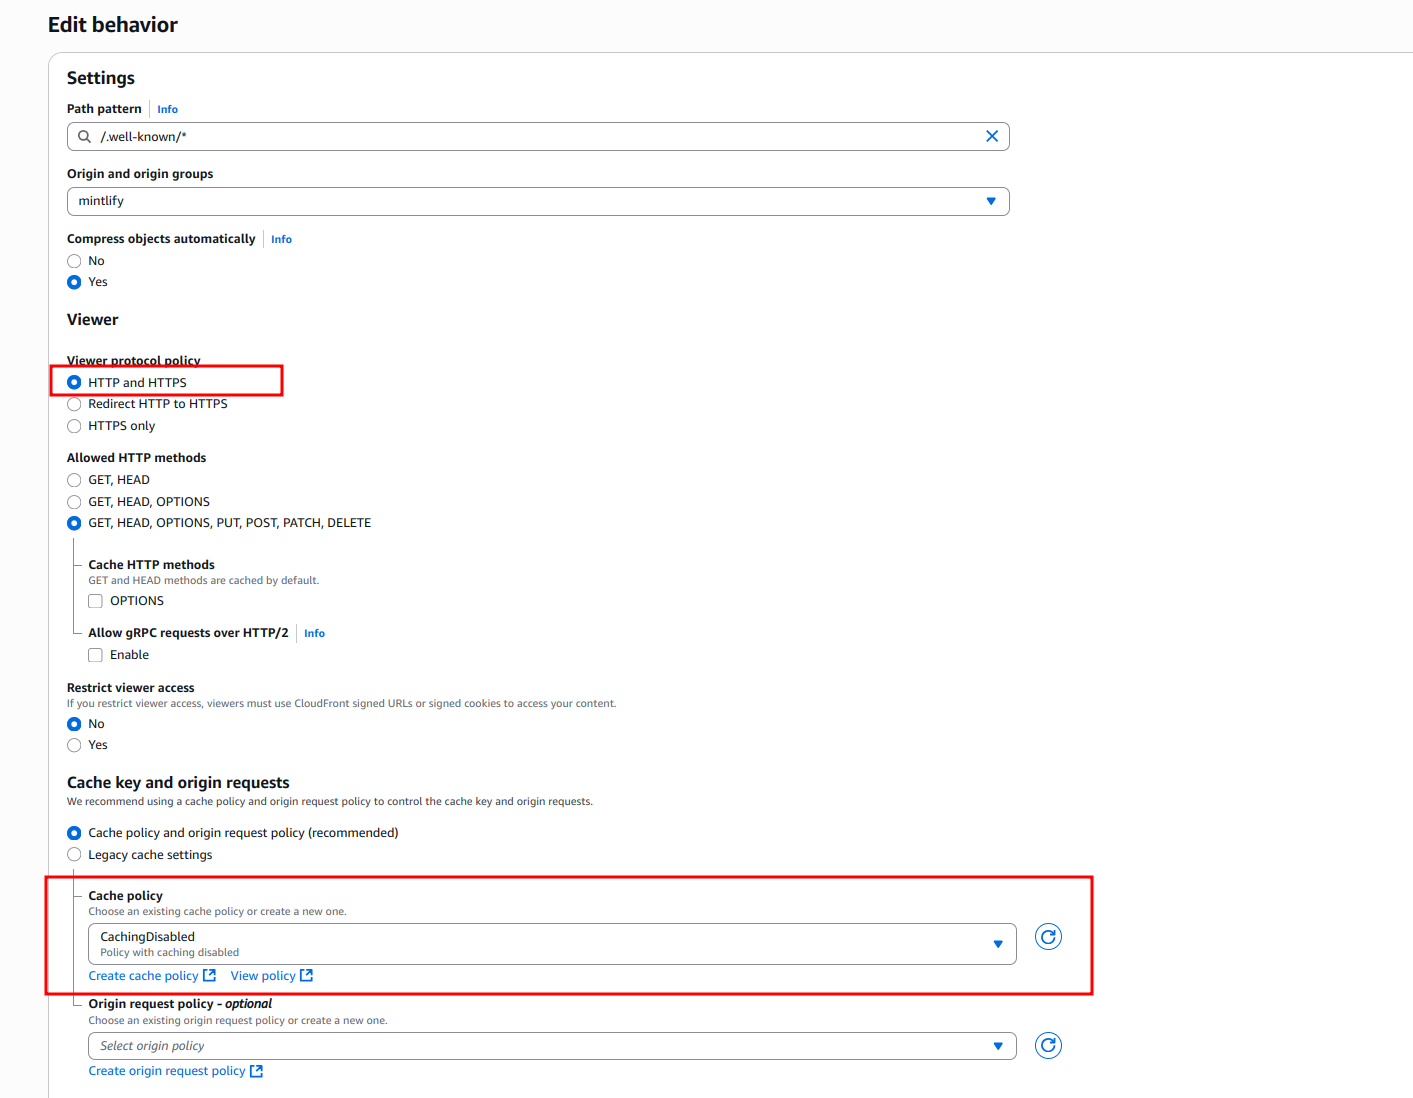
为 Vercel 域名验证路径创建一个 **Path pattern** 为 `/.well-known/*` 的行为，并将 **Origin and origin groups** 设置为你的文档 URL。

在 “Cache policy” 中选择 **CachingDisabled**，以确保这些验证请求不被缓存，能够直接通过。

<Frame>
  <img src="https://mintcdn.com/omer-914cc1c6/AiL60EGGBeap42Y0/images/cloudfront/well-known-policy.png?fit=max&auto=format&n=AiL60EGGBeap42Y0&q=85&s=88d29c97195304dc17352a3586e29595" alt="CloudFront「Create behavior」页面，&#x22;Path pattern&#x22; 为 &#x22;/.well-known/*&#x22;，且 &#x22;Origin and origin groups&#x22; 指向预发布环境的 URL。" width="1413" height="1098" data-path="images/cloudfront/well-known-policy.png" />
</Frame>

<Info>
  如果 `.well-known/*` 过于宽泛，至少可以为 Vercel 将其细分为 2 个行为：

  * `/.well-known/vercel/*` - Vercel 域名验证所必需
  * `/.well-known/acme-challenge/*` - Let's Encrypt 证书验证所必需
</Info>

<div id="your-custom-subpath">
  ### 自定义子路径
</div>

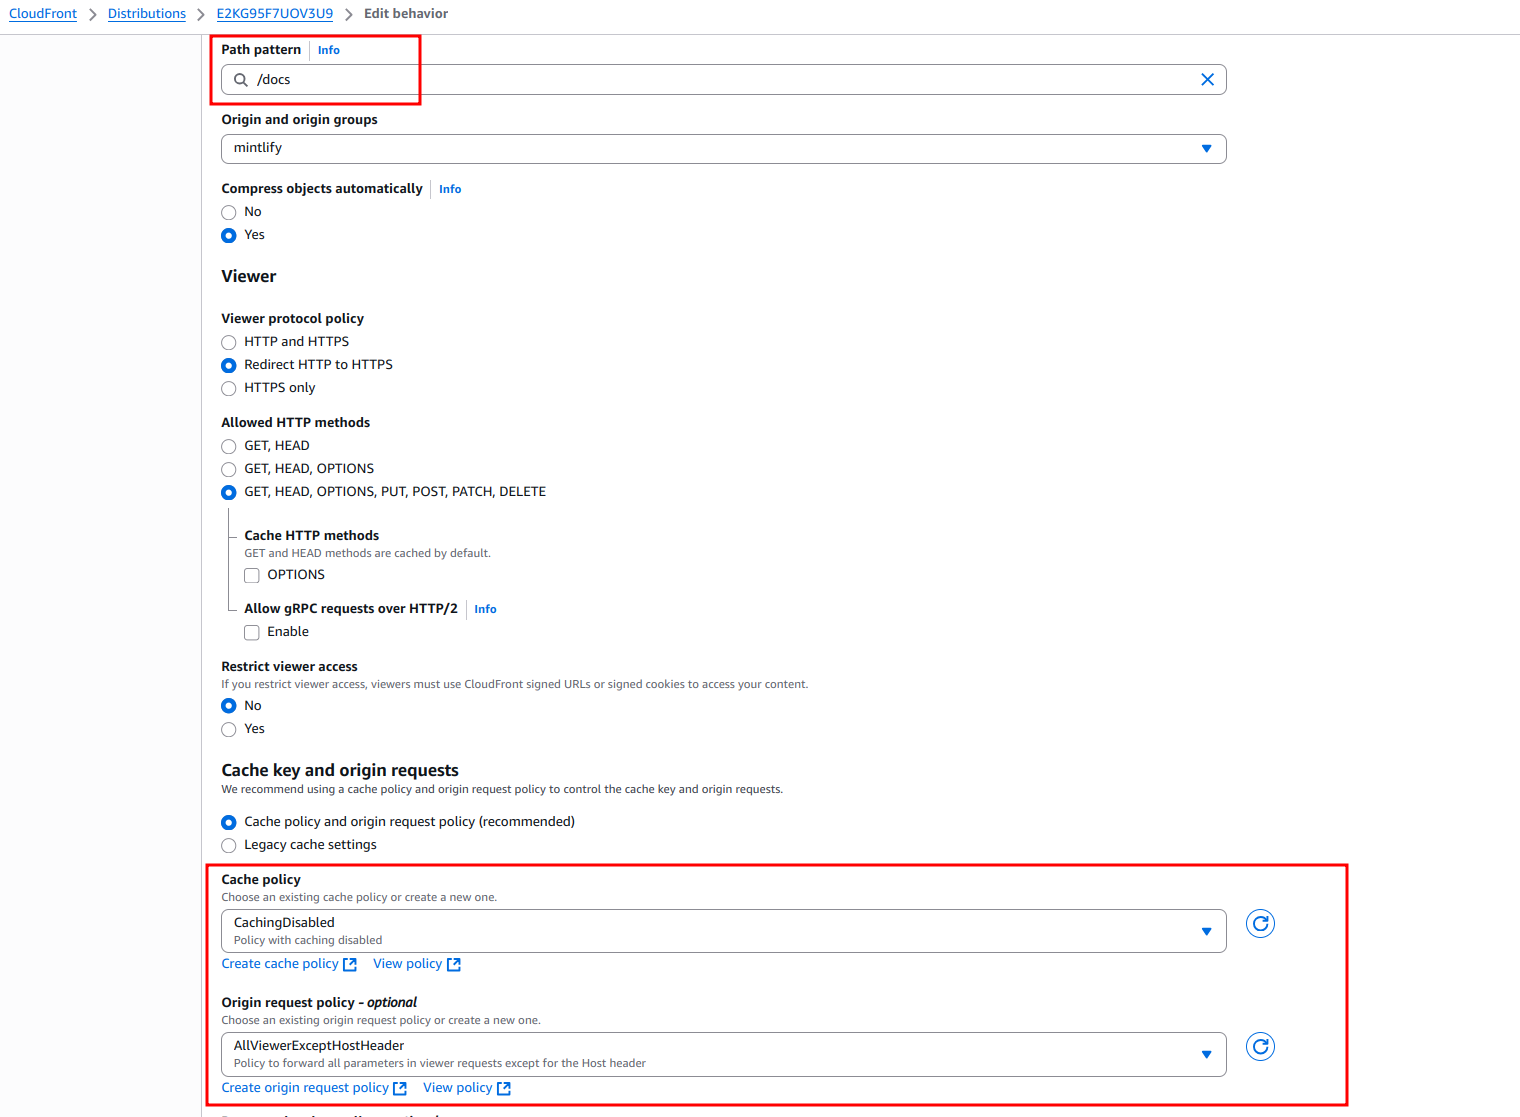
创建一个行为（Behavior），将你选择的子路径填入 **Path pattern**，例如 `/docs`，并将 **Origin and origin groups** 指向 `.mintlify.dev` 的 URL（此处为 `acme.mintlify.dev`）。

* 将 “Cache policy” 设置为 **CachingOptimized**。
* 将 “Origin request policy” 设置为 **AllViewerExceptHostHeader**。
* 将 “Viewer Protocol Policy” 设置为 **Redirect HTTP to HTTPS**。
<Frame>
  <img src="https://mintcdn.com/omer-914cc1c6/AiL60EGGBeap42Y0/images/cloudfront/behavior-1.png?fit=max&auto=format&n=AiL60EGGBeap42Y0&q=85&s=01f57f8be88850eb1f2919b319d8851e" alt="CloudFront “Create behavior” 页面，其中 “Path pattern”为 “/docs/*”，且 “Origin and origin groups” 指向 acme.mintlify.dev 的 URL。" width="1520" height="1117" data-path="images/cloudfront/behavior-1.png" />
</Frame>

<div id="your-custom-subpath-with-wildcard">
  ### 你的自定义带通配符的子路径
</div>

创建一个行为，将你选择的子路径加上 `/*` 作为 **Path pattern**（例如 `/docs/*`），并将 **Origin and origin groups** 指向相同的 `.mintlify.dev` URL。

除 **Path pattern** 外，这些设置应与基础子路径的行为完全一致。

* 将“Cache policy”设置为 **CachingOptimized**。
* 将“Origin request policy”设置为 **AllViewerExceptHostHeader**。
* 将“Viewer protocol policy”设置为 **Redirect HTTP to HTTPS**

<div id="mintlify-assets_nextstatic">
  ### `/mintlify-assets/_next/static/*`
</div>

* 将“Cache policy”设置为 **CachingOptimized**
* 将“Origin request policy”设置为 **AllViewerExceptHostHeader**
* 将“Viewer protocol policy”设置为 **Redirect HTTP to HTTPS**

<div id="default">
  ### `Default (*)`
</div>

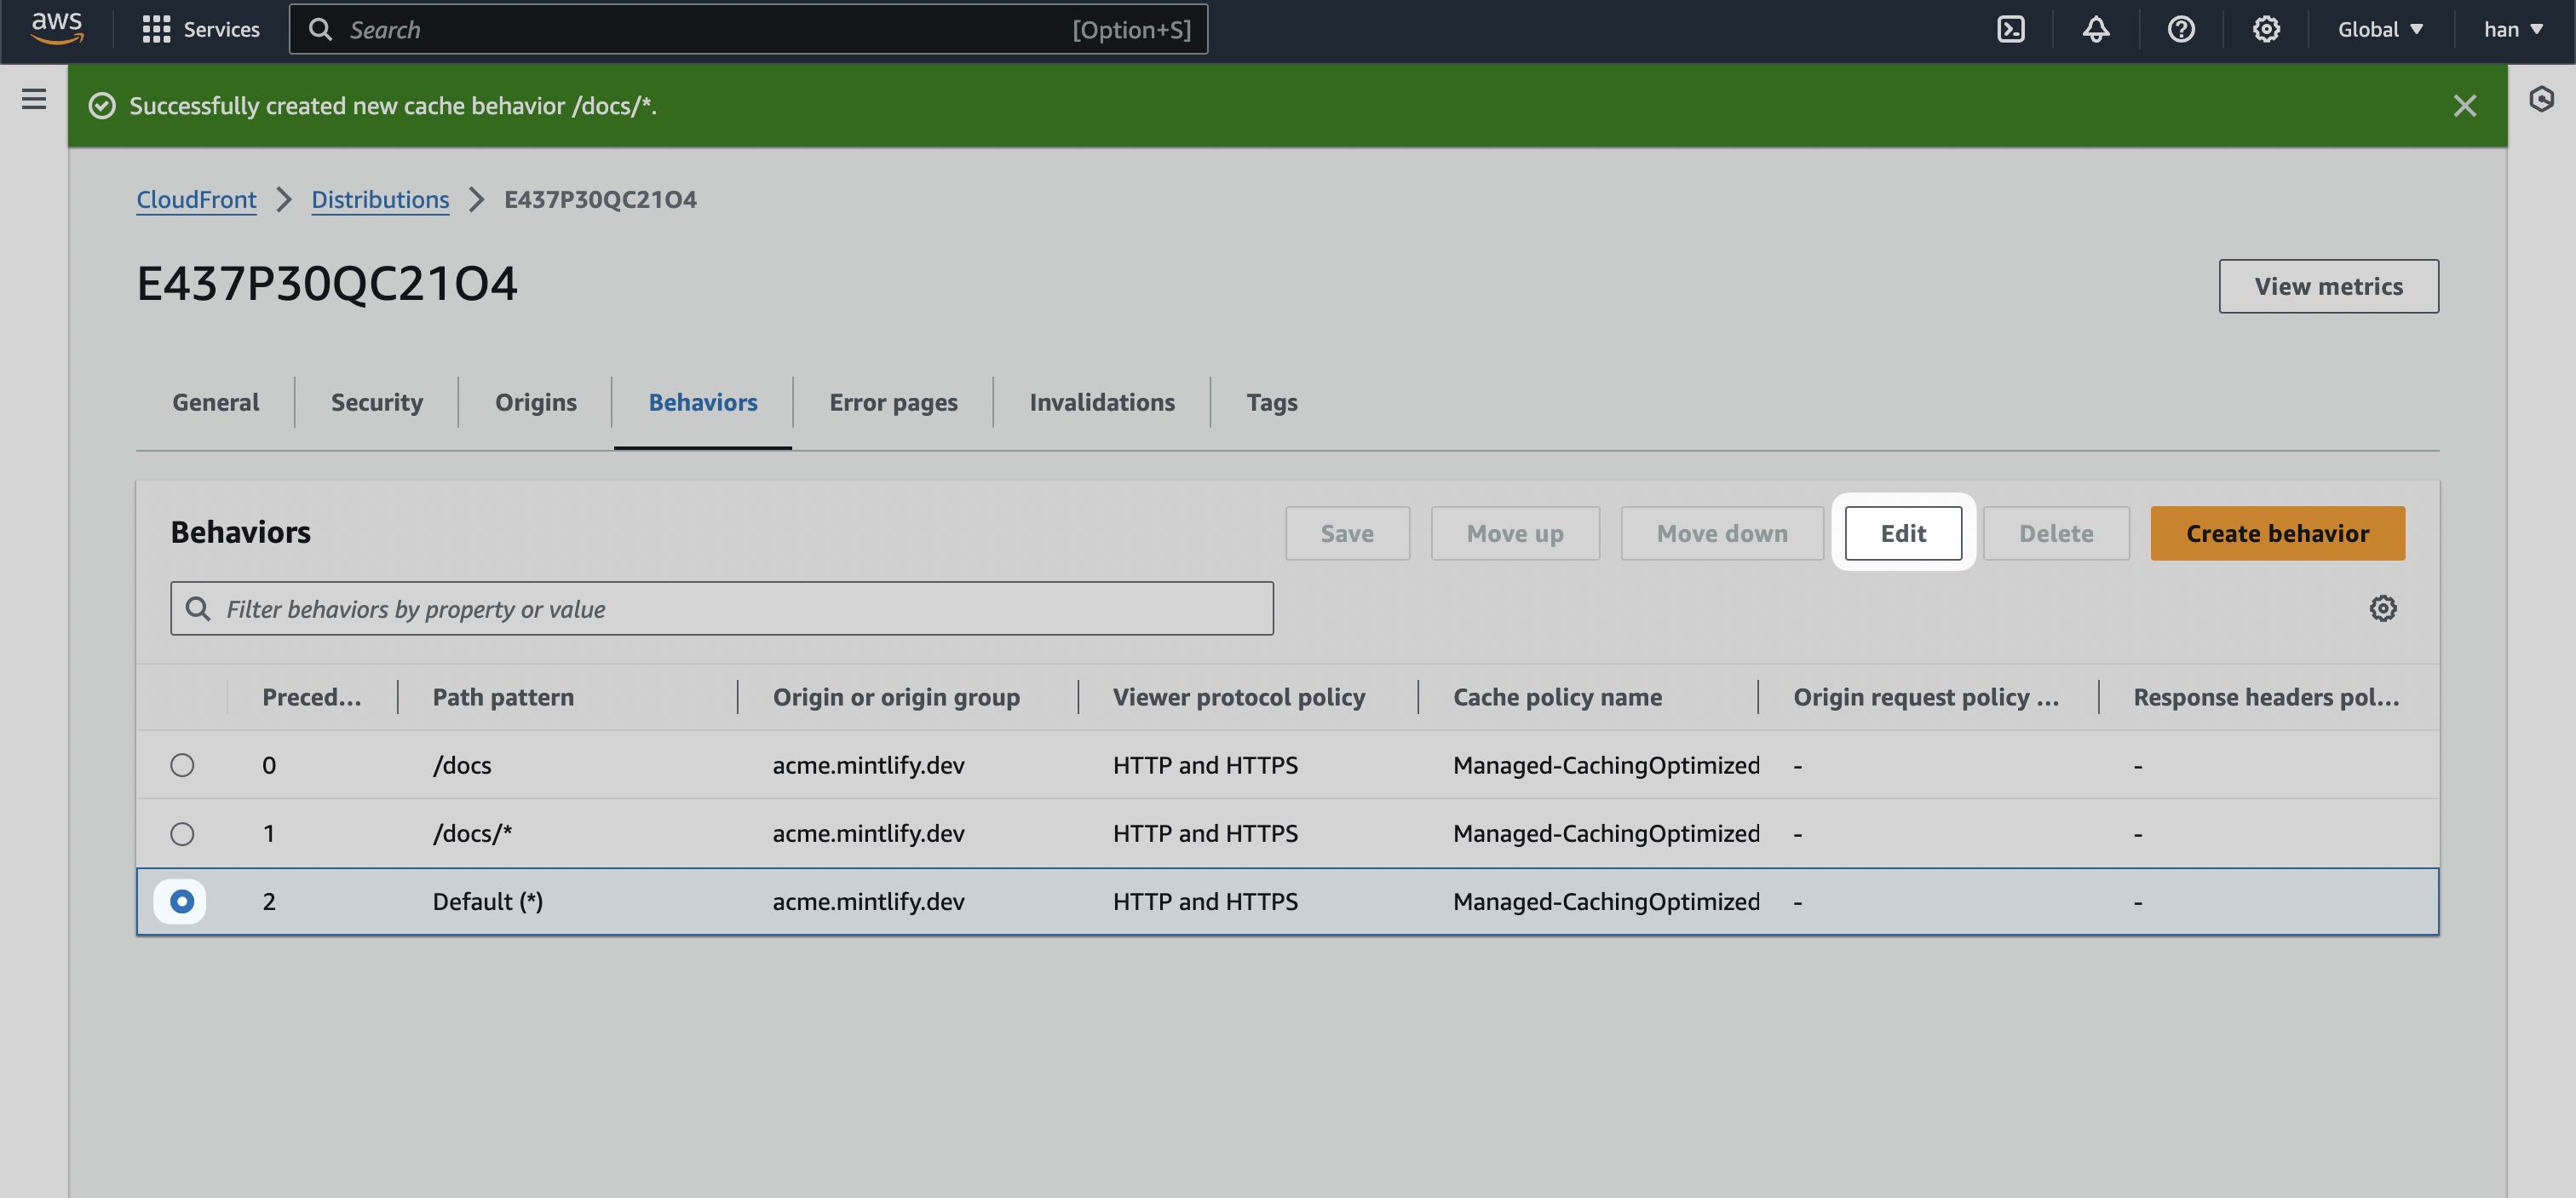
最后，我们将编辑 `Default (*)` 行为。

<Frame>
  <img src="https://mintcdn.com/omer-914cc1c6/AiL60EGGBeap42Y0/images/cloudfront/default-behavior-1.png?fit=max&auto=format&n=AiL60EGGBeap42Y0&q=85&s=d1028ea337a4f8fbda88086ed80edabb" alt="已选择 “Default (*)” 行为并突出显示 Edit 按钮的 CloudFront 分配。" width="3024" height="1406" data-path="images/cloudfront/default-behavior-1.png" />
</Frame>

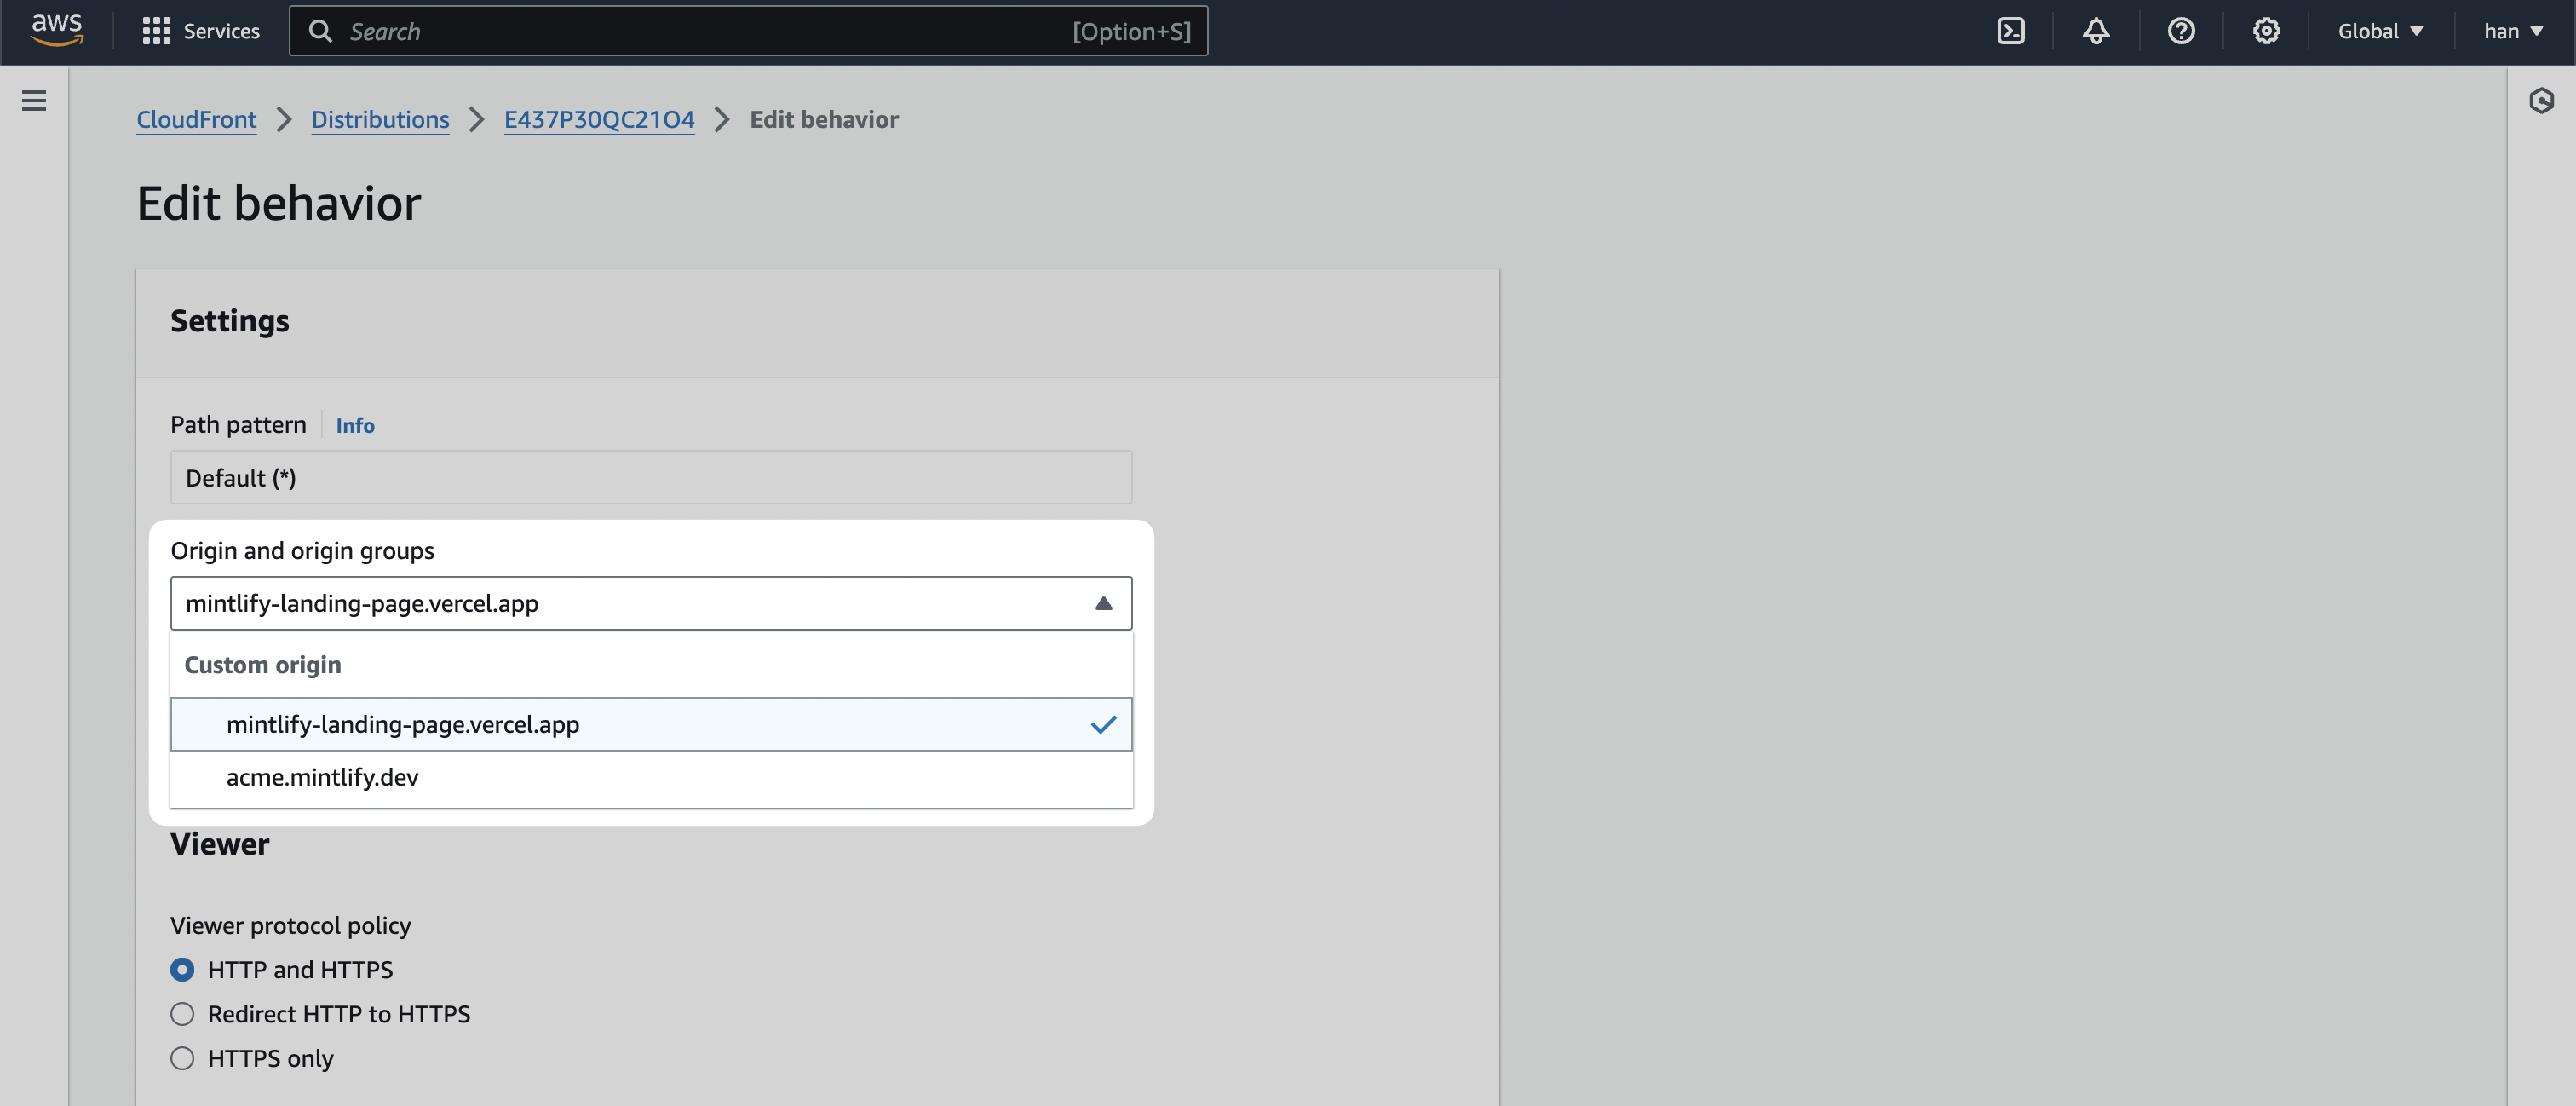
1. 将默认行为的 **Origin and origin groups** 更改为预发布环境的 URL（本例为 `mintlify-landing-page.vercel.app`）。

<Frame>
  <img src="https://mintcdn.com/omer-914cc1c6/AiL60EGGBeap42Y0/images/cloudfront/default-behavior-2.png?fit=max&auto=format&n=AiL60EGGBeap42Y0&q=85&s=d363a70a1e99f274a3aca8f47fb2f909" alt="CloudFront 的 “Edit behavior” 页面，突出显示 “Origin and origin groups” 输入字段。" width="3024" height="1298" data-path="images/cloudfront/default-behavior-2.png" />
</Frame>

2. 选择 **保存更改**。

<div id="check-behaviors-are-set-up-correctly">
  ### 确认已正确配置 Behaviors
</div>

如果你按照上述步骤操作，Behaviors 应如下所示：

<Frame>
  <img src="https://mintcdn.com/omer-914cc1c6/AiL60EGGBeap42Y0/images/cloudfront/all-behaviors.png?fit=max&auto=format&n=AiL60EGGBeap42Y0&q=85&s=e28ca7f1a2e94eeb8eed62f6ae5c1d53" alt="CloudFront「Behaviors」页面，包含 4 个行为：/docs/*、/docs、Default 和 /.well-known/*。" width="1603" height="365" data-path="images/cloudfront/all-behaviors.png" />
</Frame>

<div id="preview-distribution">
  ## 预览分发
</div>

现在可以前往“General”标签页并访问 **Distribution domain name** 的 URL，测试分发是否已正确配置。

<Frame>
  <img src="https://mintcdn.com/omer-914cc1c6/AiL60EGGBeap42Y0/images/cloudfront/preview-distribution.png?fit=max&auto=format&n=AiL60EGGBeap42Y0&q=85&s=ac51d2fb595da7c4321df07b75ea91c2" alt="CloudFront “General” 标签页，已高亮显示 “Distribution domain name” 的 URL。" width="3024" height="1394" data-path="images/cloudfront/preview-distribution.png" />
</Frame>

所有页面应指向你的主登录页；如果在该 URL 后追加你选择的子路径（例如 `/docs`），应会跳转到你的 Mintlify 文档实例。

<div id="connect-with-route53">
  ## 连接 Route53
</div>

现在，我们将把 CloudFront 分配（Distribution）的功能接入你的主域名。

<Note>
  本节你也可以参考 AWS 官方指南：[Configuring
  Amazon Route 53 to route traffic to a CloudFront
  distribution](https://docs.aws.amazon.com/Route53/latest/DeveloperGuide/routing-to-cloudfront-distribution.html#routing-to-cloudfront-distribution-config)
</Note>

1. 在 AWS 控制台中进入 [Route53](https://aws.amazon.com/route53)。
2. 进入主域名的 "Hosted zone"。
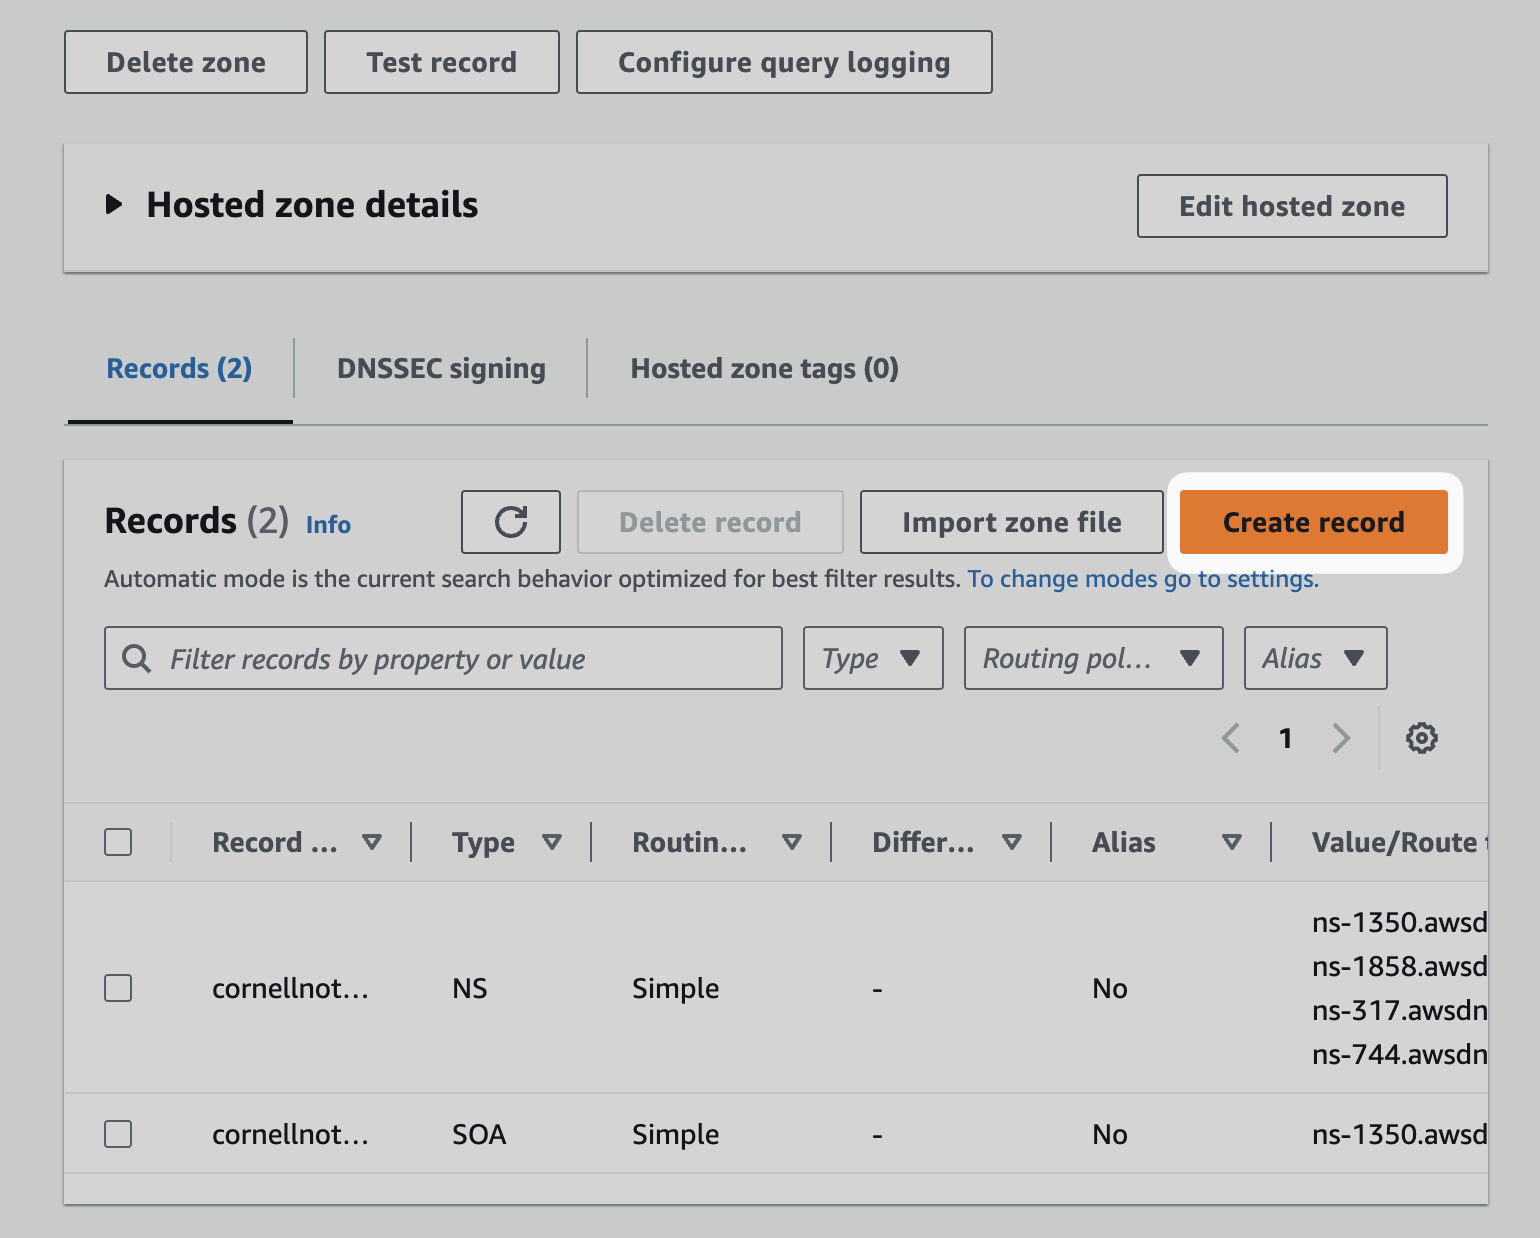
3. 选择 **Create record**。
<Frame>
  <img src="https://mintcdn.com/omer-914cc1c6/AiL60EGGBeap42Y0/images/cloudfront/route53-create-record.png?fit=max&auto=format&n=AiL60EGGBeap42Y0&q=85&s=42fa1ebe5bde68138c9a5a5e6ef536e5" alt="Route 53「Records」页面，突出显示「Create record」按钮。" width="1540" height="1238" data-path="images/cloudfront/route53-create-record.png" />
</Frame>

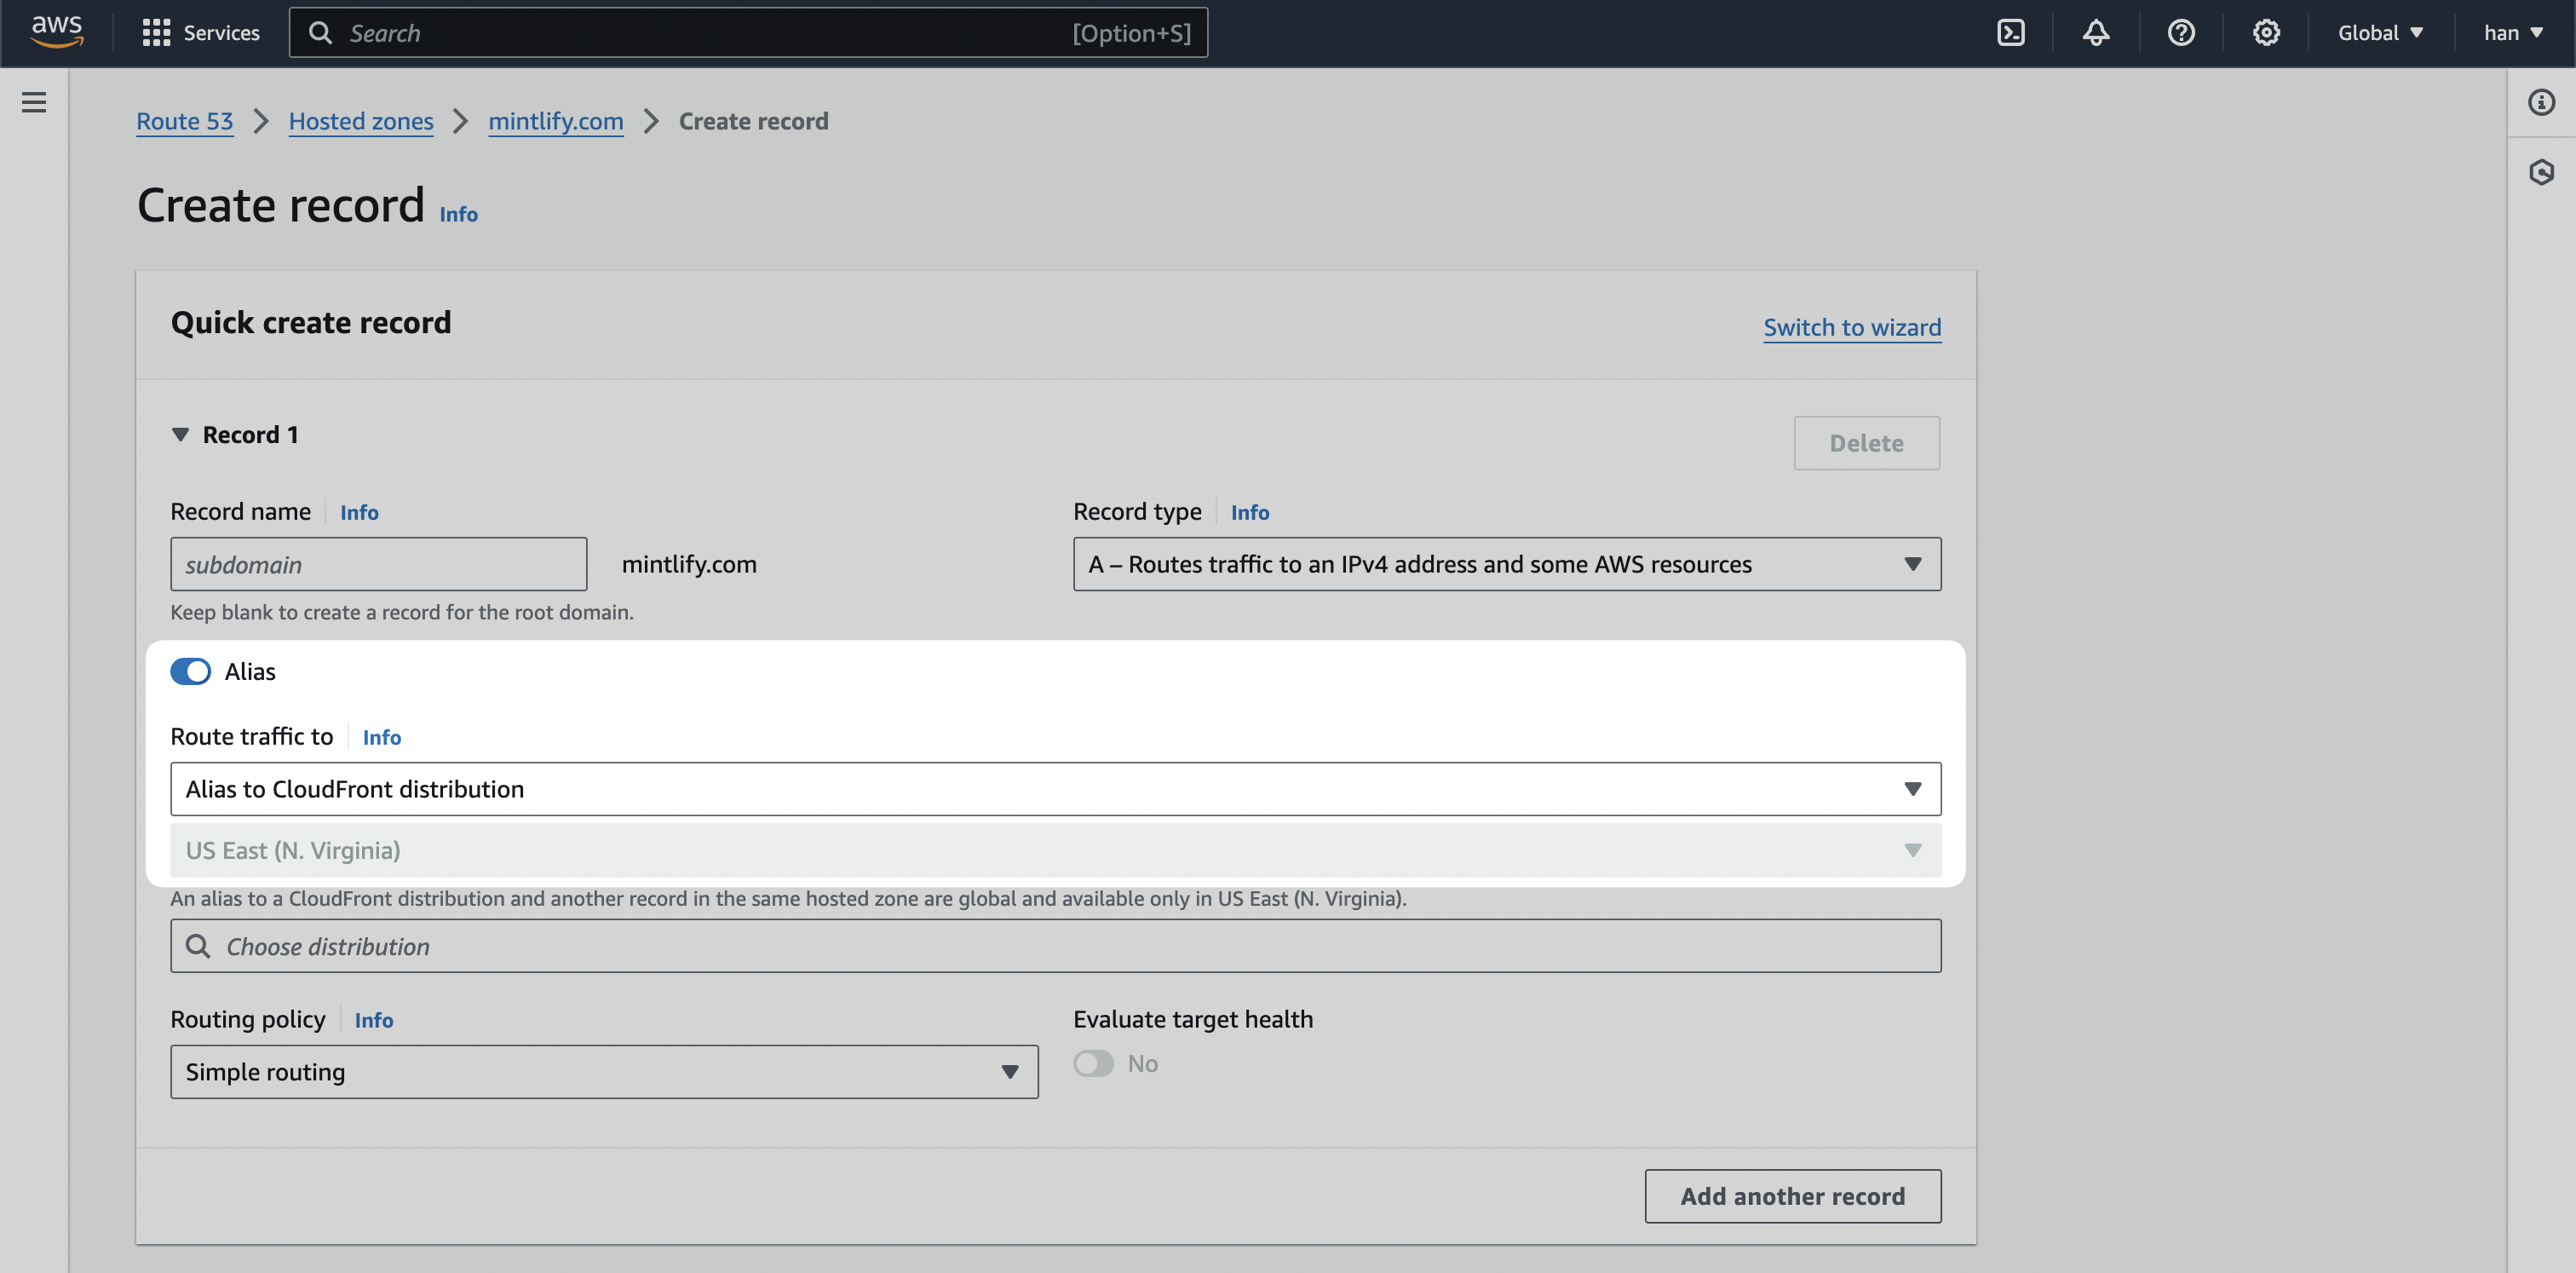
4. 打开 `Alias`，然后在 **Route traffic to** 中选择 `Alias to CloudFront distribution` 选项。
<Frame>
  <img src="https://mintcdn.com/omer-914cc1c6/AiL60EGGBeap42Y0/images/cloudfront/create-record-alias.png?fit=max&auto=format&n=AiL60EGGBeap42Y0&q=85&s=7aeda5e74a5feca3e34da2b72cde532f" alt="Route 53「Create record」页面，突出显示「Alias」开关与「Route traffic to」菜单。" width="3024" height="1494" data-path="images/cloudfront/create-record-alias.png" />
</Frame>

5. 选择 **Create records**。

<Note>
  如果当前存在 A 记录，可能需要先将其移除。
</Note>

你的文档现已在主域名的所选子路径上线。

<Note>
  配置好 DNS（域名系统）后，自定义子域通常会在几分钟内生效。DNS 传播有时可能需要 1–4 小时，极少数情况下可达 48 小时。如果您的子域未能立即生效，请先耐心等待，再进行故障排查。
</Note>