> ## Documentation Index
> Fetch the complete documentation index at: https://omer-914cc1c6.mintlify.site/llms.txt
> Use this file to discover all available pages before exploring further.

# GitLab

> Sincroniza tu documentación con un repositorio de GitLab

Usamos tokens de acceso y webhooks para autenticar y sincronizar cambios entre GitLab y Mintlify.

* Mintlify usa tokens de acceso para obtener información de GitLab.
* GitLab usa webhooks para notificar a Mintlify cuando se realizan cambios, lo que habilita implementaciones de vista previa para las solicitudes de merge.

<div id="set-up-the-connection">
  ## Configura la conexión
</div>

<Note>
  **Se requiere clonación por HTTPS**: Tu proyecto de GitLab debe tener habilitada la clonación por HTTPS para que Mintlify pueda acceder a tu repositorio. Puedes verificarlo en GitLab yendo a **Settings** > **General** > **Visibility and access controls**.
</Note>

<Steps>
  <Step title="Find your project ID">
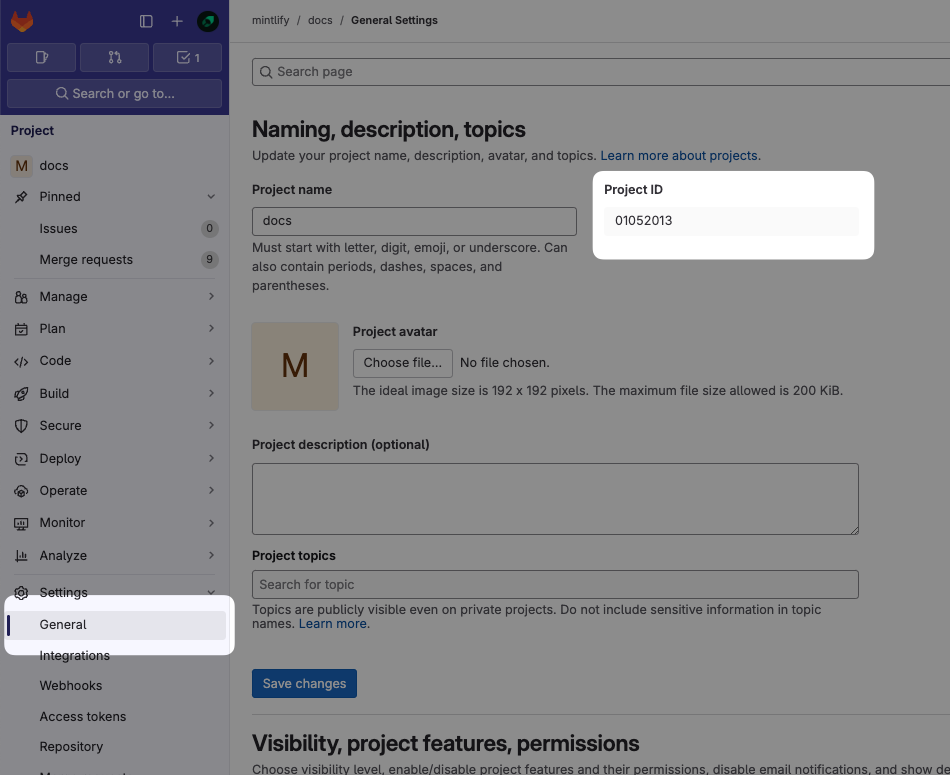
    En tu proyecto de GitLab, ve a **Settings** > **General** y localiza tu **Project ID**.

    <Frame>
      <img src="https://mintcdn.com/omer-914cc1c6/1pfjDJXEL6HIHDKE/images/gitlab/gitlab-project-id.png?fit=max&auto=format&n=1pfjDJXEL6HIHDKE&q=85&s=c7f0ef7996dc1e5813770046e9294802" alt="La página General Settings en el dashboard de GitLab. El Project ID está resaltado." width="950" height="775" data-path="images/gitlab/gitlab-project-id.png" />
    </Frame>
  </Step>

  <Step title="Generate an access token">
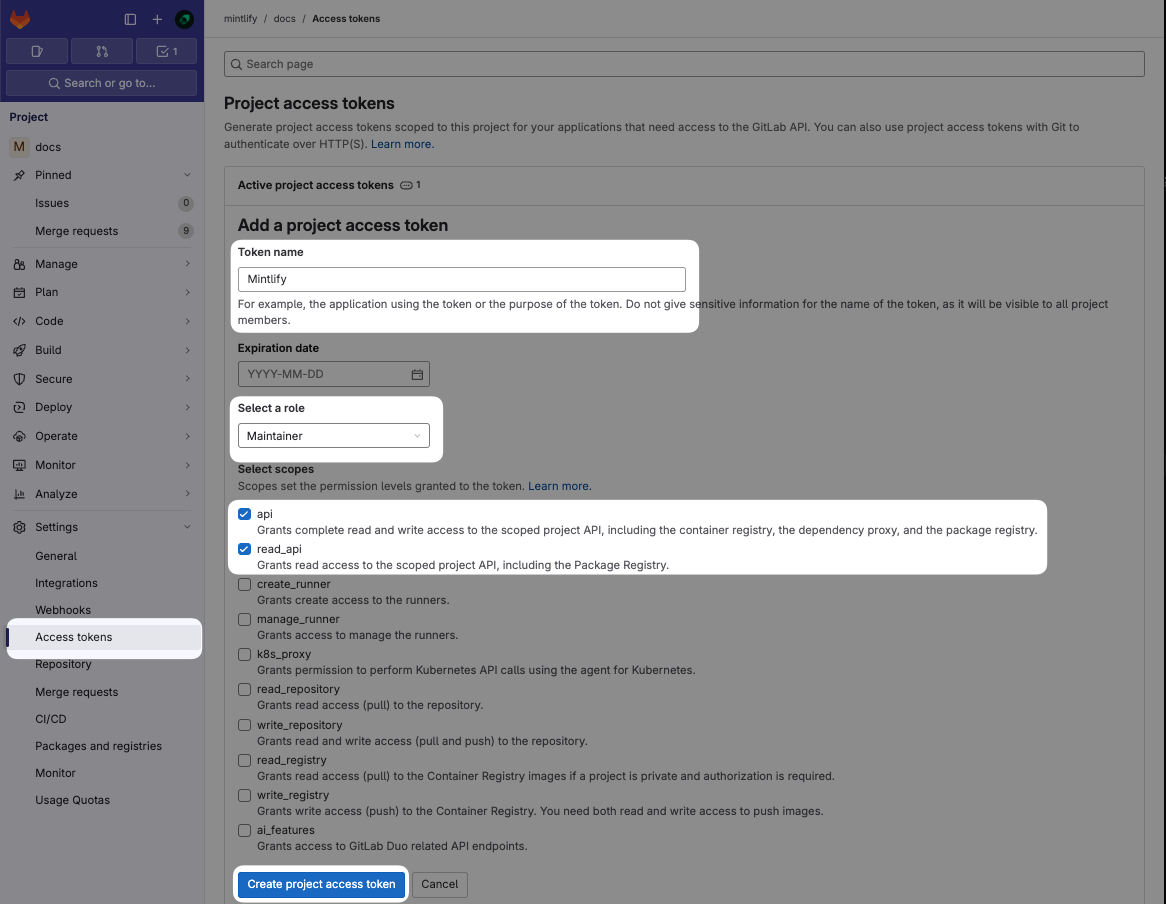
    Ve a **Settings** > **Access Tokens** y selecciona **Add new token**.

    Configura el token con estos parámetros:

    * **Name**: Mintlify
    * **Role**: Maintainer (obligatorio para repositorios privados)
    * **Scopes**: `api` y `read_api`

    Haz clic en **Create project access token** y copia el token.

    <Note>
      Si Project Access Tokens no está disponible, puedes usar un Personal Access Token. Ten en cuenta que los Personal Access Tokens caducan y deben actualizarse.
    </Note>

    <Frame>
      <img src="https://mintcdn.com/omer-914cc1c6/1pfjDJXEL6HIHDKE/images/gitlab/gitlab-project-access-token.png?fit=max&auto=format&n=1pfjDJXEL6HIHDKE&q=85&s=529adadb960ed37e9c9f0b74b9c54773" alt="La página Access tokens en el dashboard de GitLab. Están resaltados los parámetros que configurar para Mintlify." width="1166" height="904" data-path="images/gitlab/gitlab-project-access-token.png" />
    </Frame>
  </Step>

  <Step title="Set up the connection">
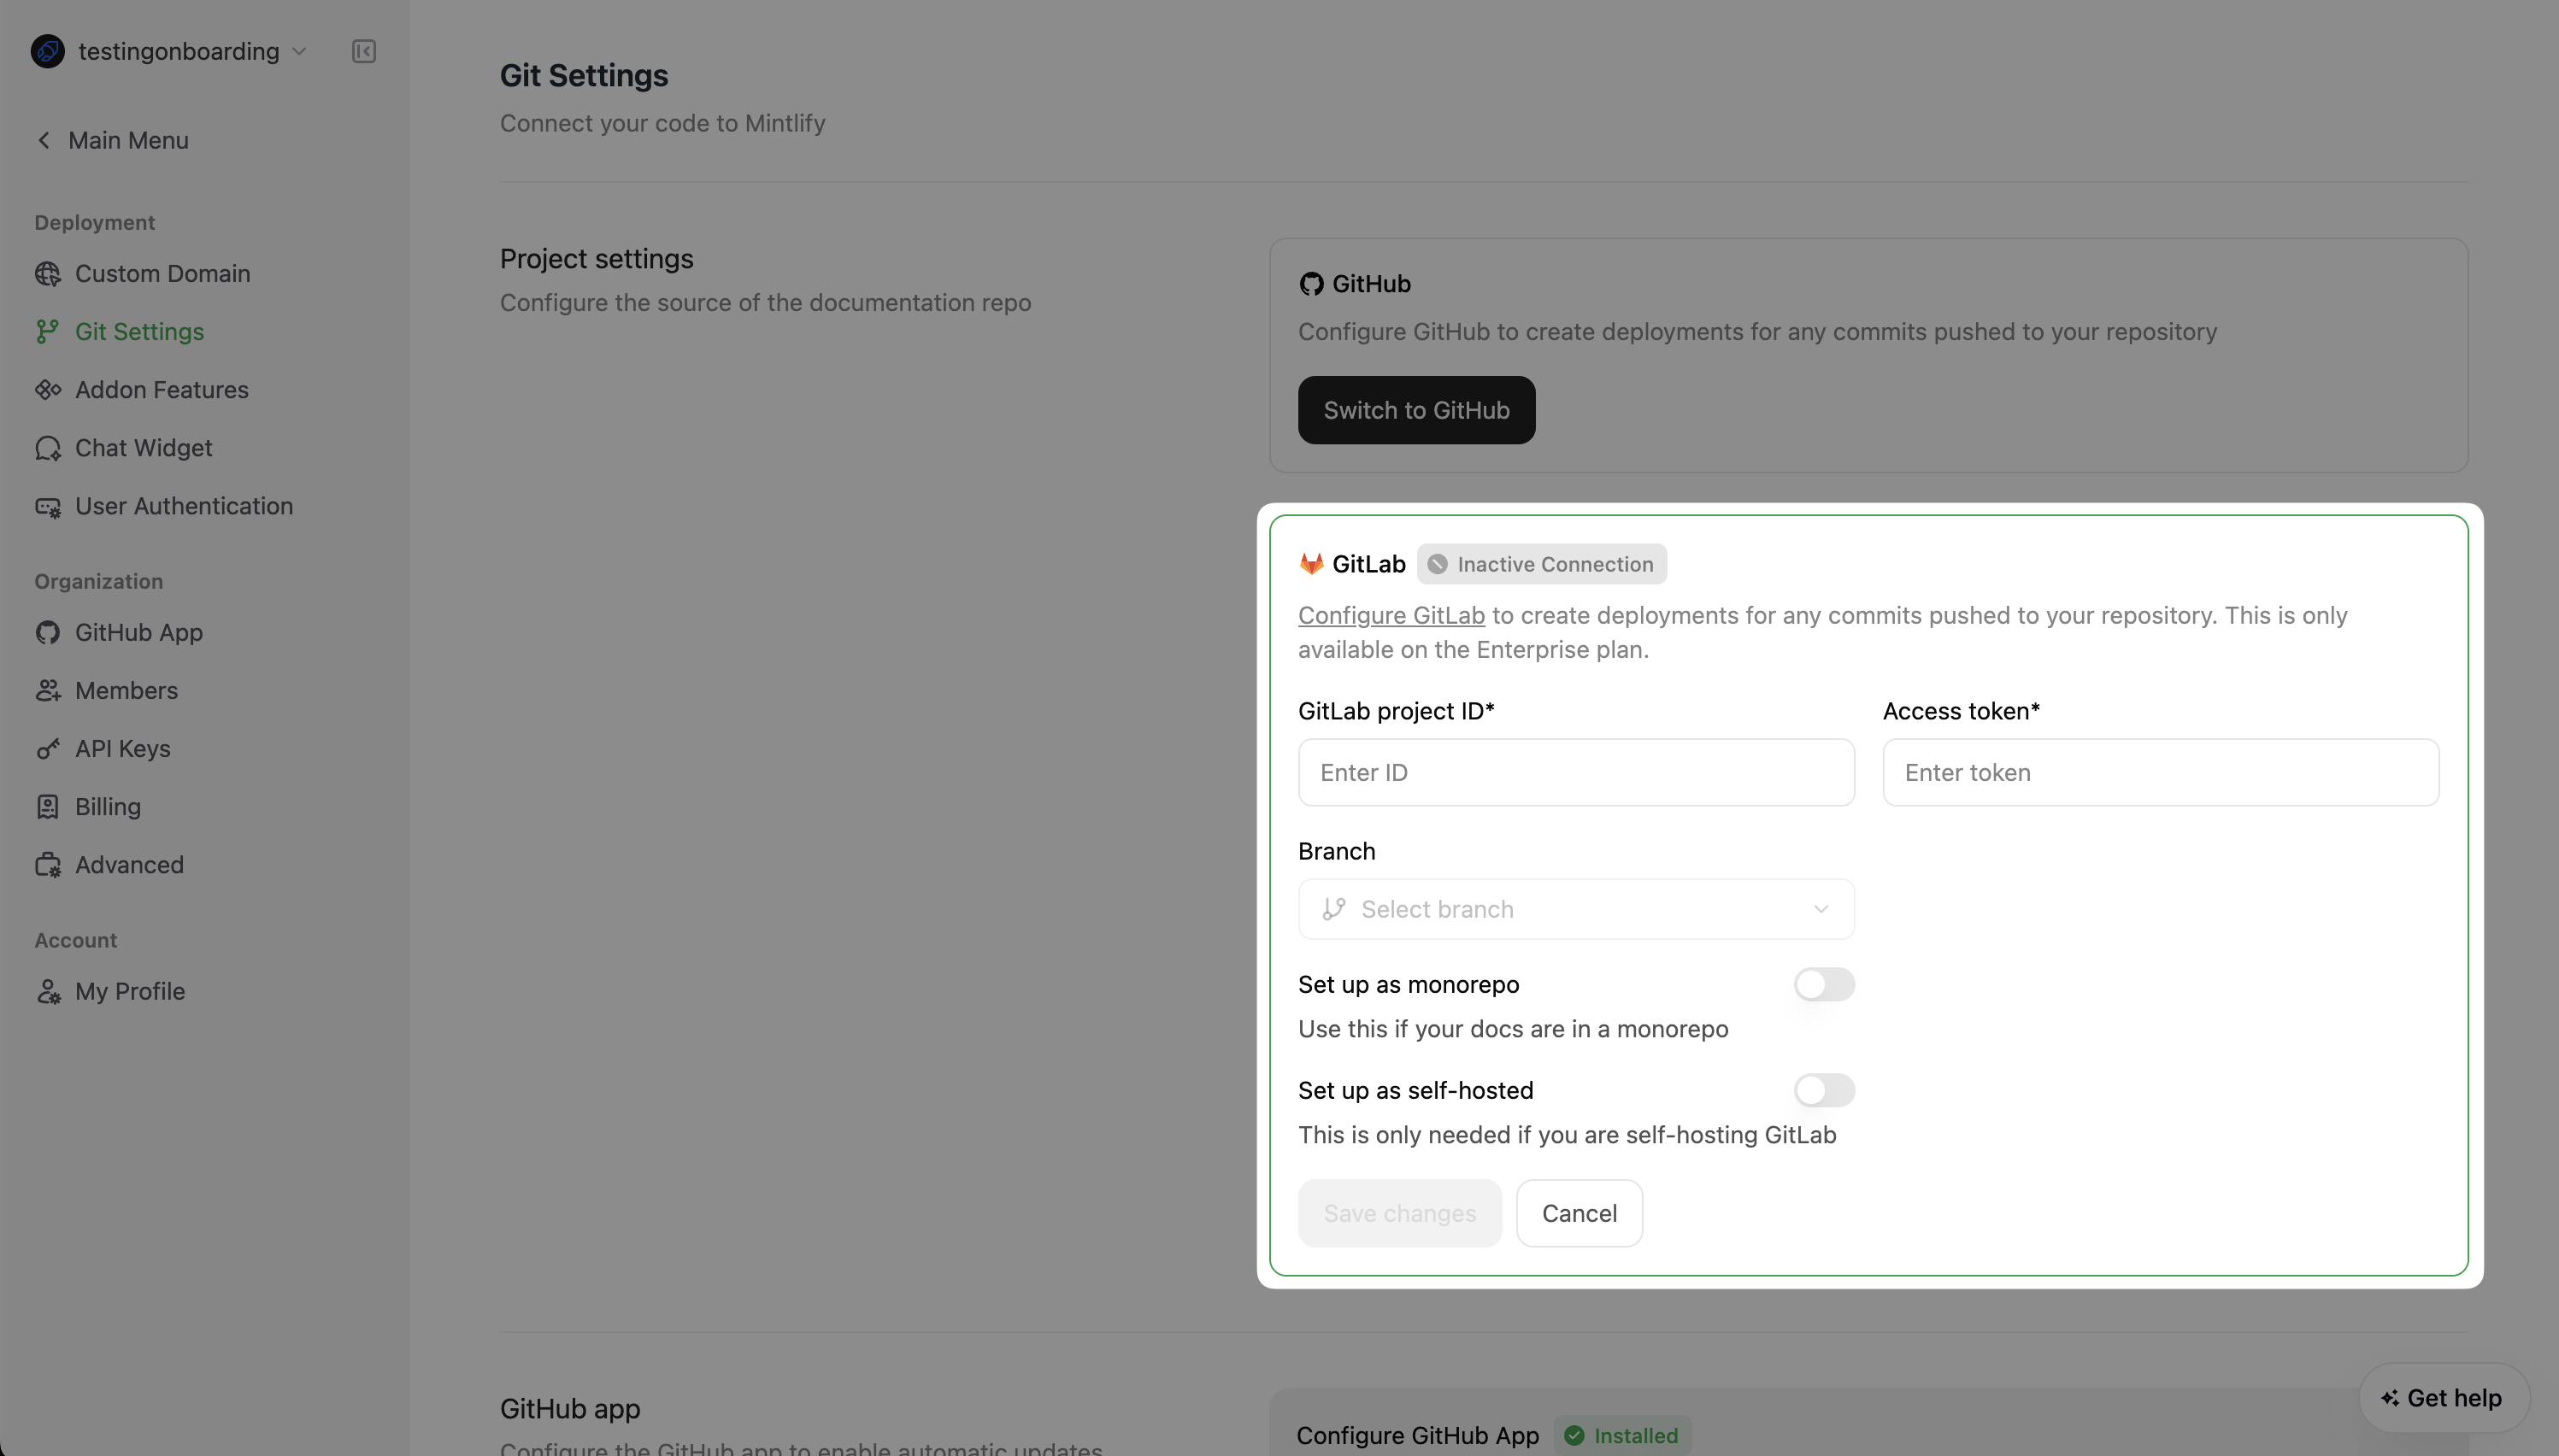
    En el [Dashboard de Mintlify](https://dashboard.mintlify.com/settings/deployment/git-settings):

    1. Ingresa tu Project ID y access token.
    2. Completa cualquier otra configuración obligatoria.
    3. Haz clic en **Guardar cambios**.

    <Frame>
      <img src="https://mintcdn.com/omer-914cc1c6/1pfjDJXEL6HIHDKE/images/gitlab/gitlab-config.png?fit=max&auto=format&n=1pfjDJXEL6HIHDKE&q=85&s=bdbbff80a9e9be5db9f67e8a5f3e9c4a" alt="La página Git Settings en el Dashboard de Mintlify. Están resaltadas las configuraciones de GitLab." width="2994" height="1704" data-path="images/gitlab/gitlab-config.png" />
    </Frame>
  </Step>
</Steps>

<div id="create-the-webhook">
  ## Crear el webhook
</div>

Los webhooks nos permiten recibir eventos cuando se realizan cambios para así
activar implementaciones automáticamente.

<Steps>
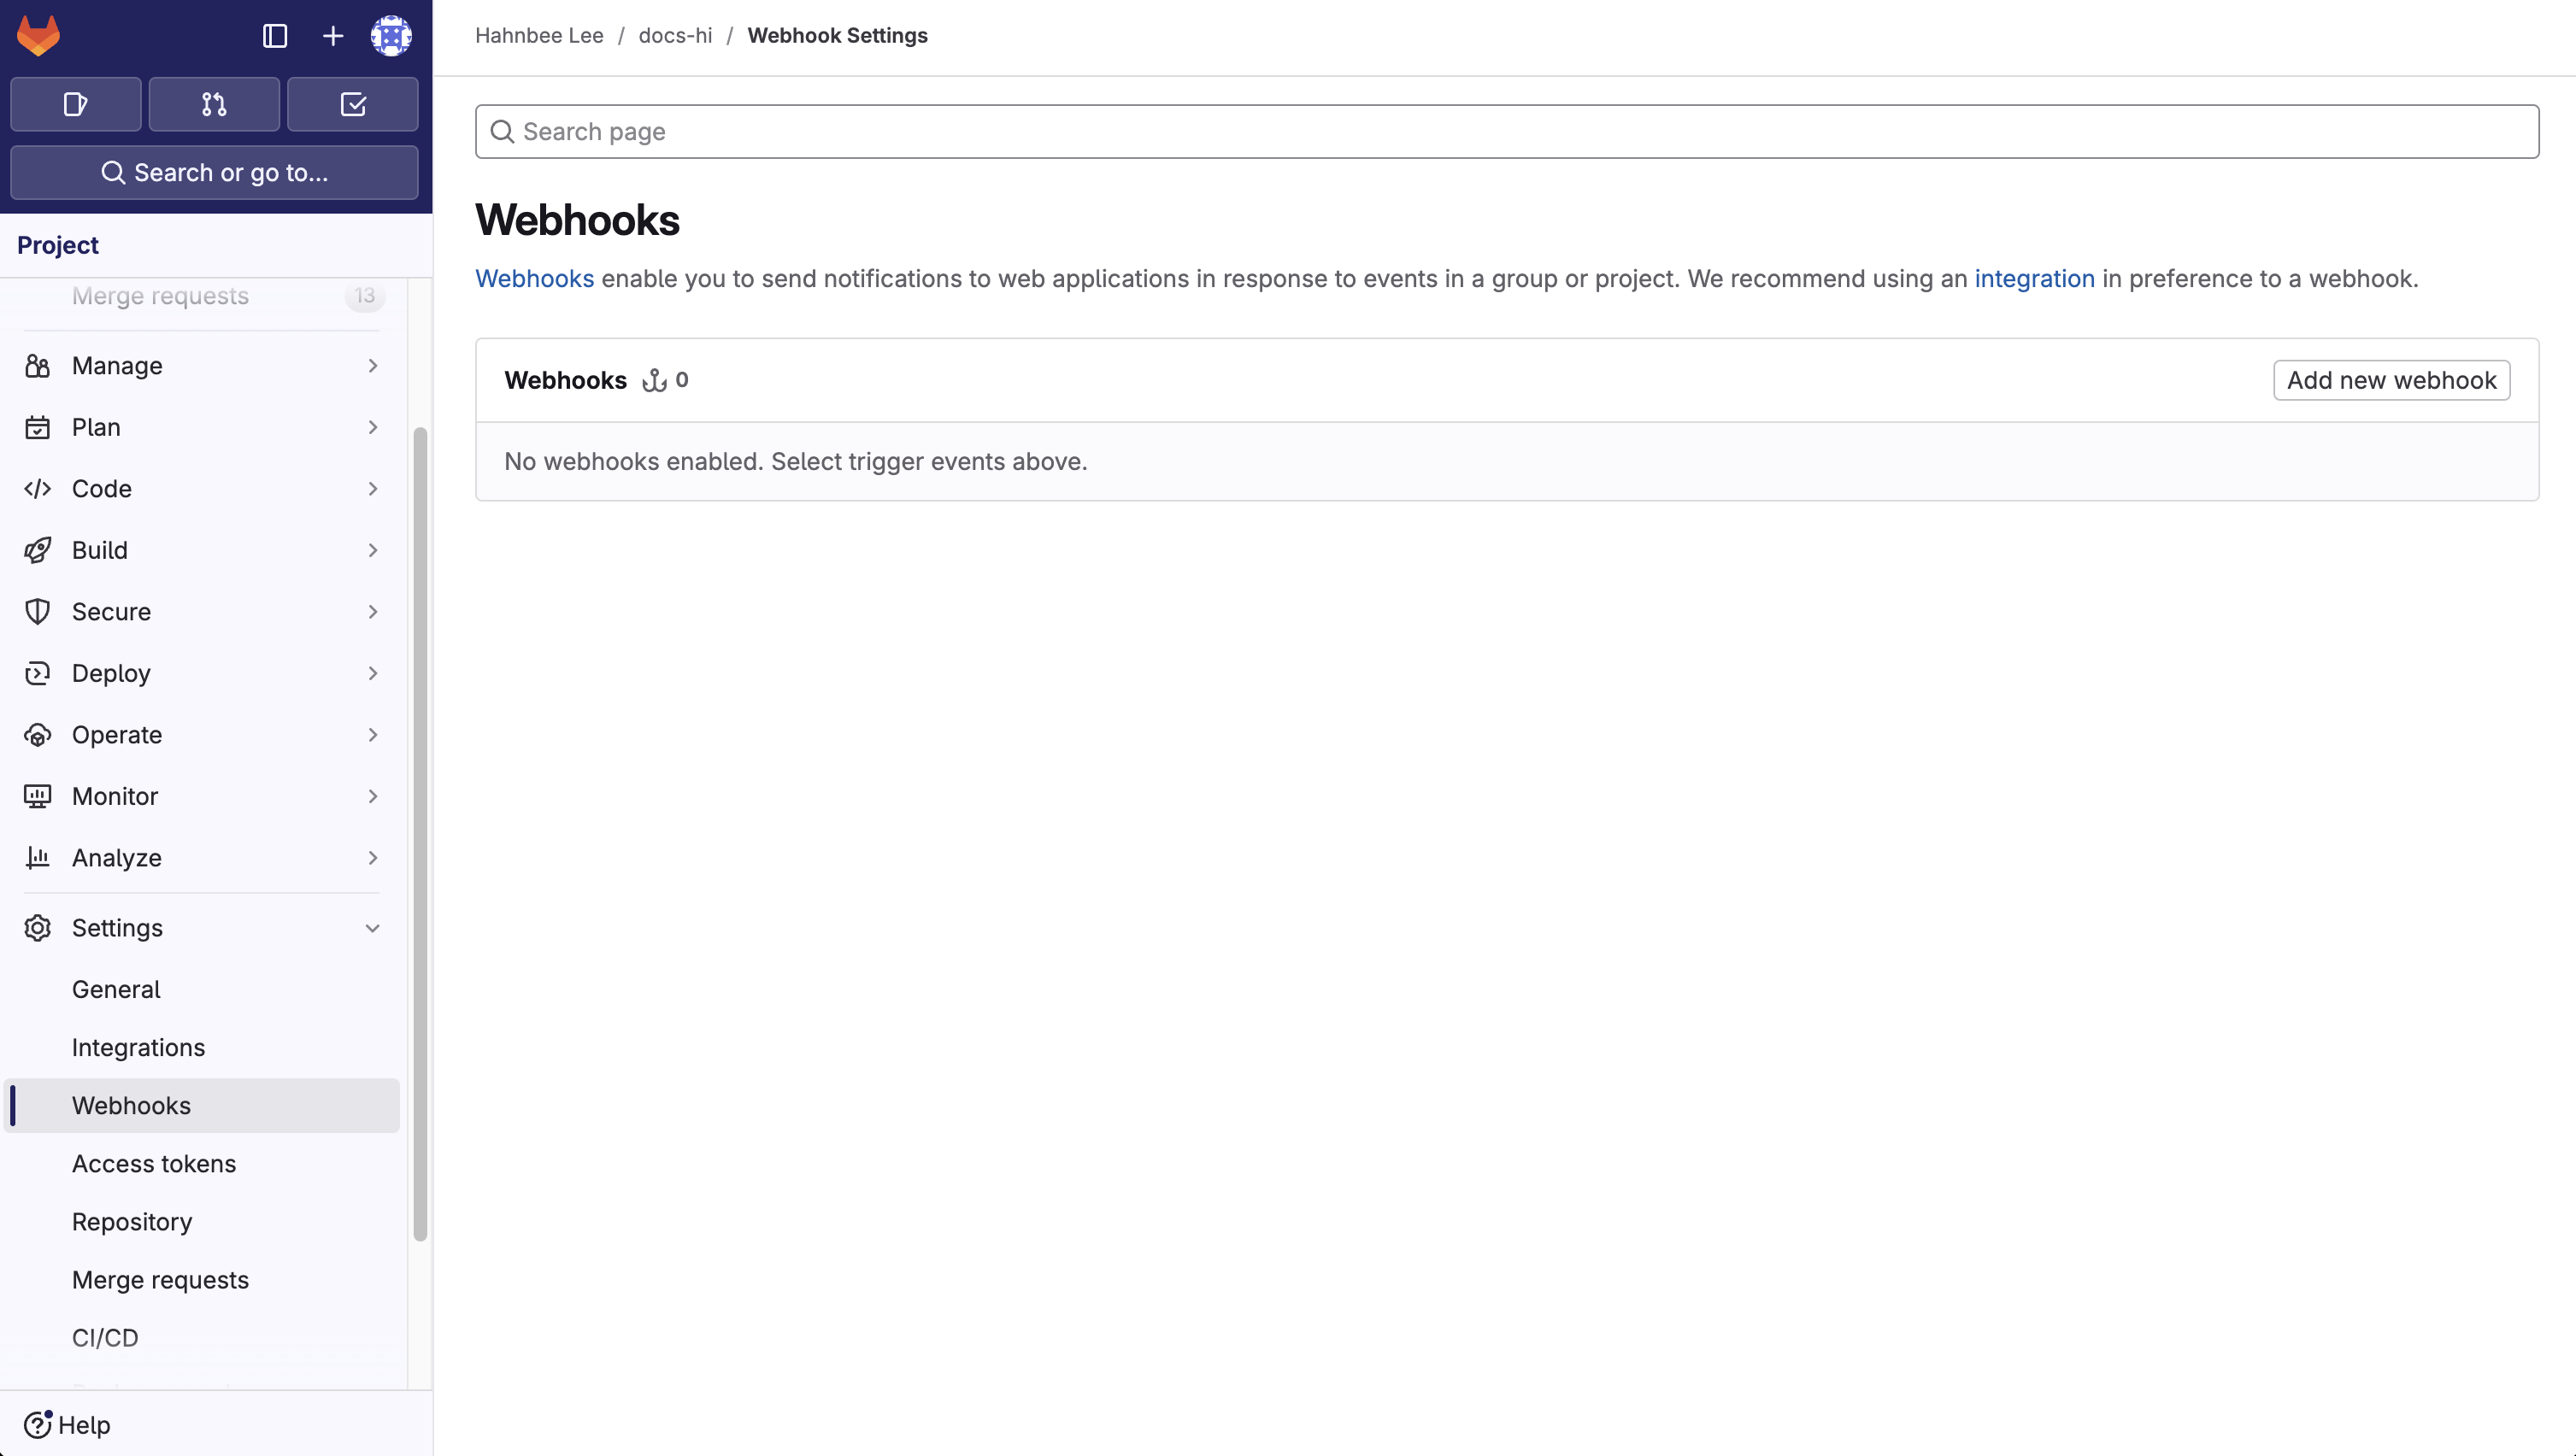
  <Step title="Ve a Settings > Webhooks y haz clic en 'Add new Webhook'">
    <Frame>
      <img src="https://mintcdn.com/omer-914cc1c6/1pfjDJXEL6HIHDKE/images/gitlab/gitlab-webhook.png?fit=max&auto=format&n=1pfjDJXEL6HIHDKE&q=85&s=9dce33ced4471cb84008f9bb49903999" width="3014" height="1704" data-path="images/gitlab/gitlab-webhook.png" />
    </Frame>
  </Step>

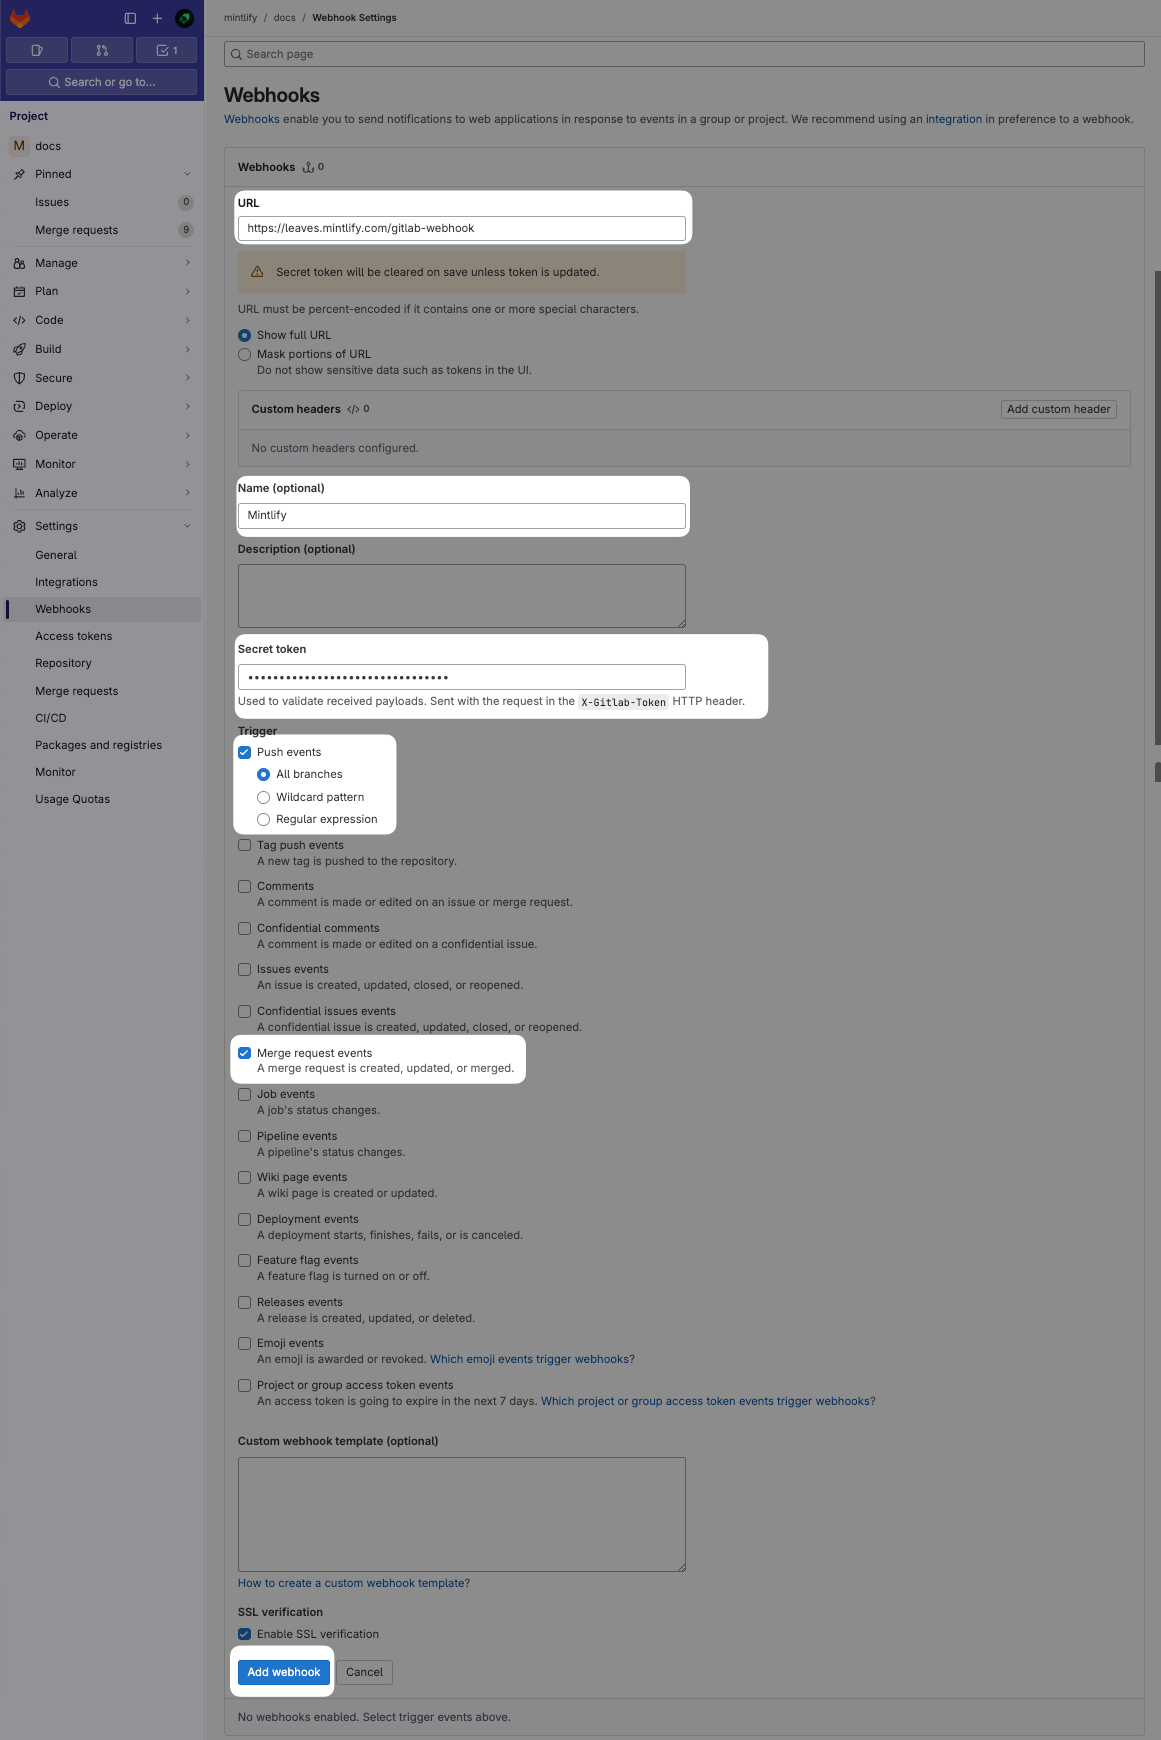
  <Step title="Configura la URL y el webhook">
    En el campo "URL", introduce el endpoint `https://leaves.mintlify.com/gitlab-webhook` y nombra el webhook "Mintlify".
  </Step>

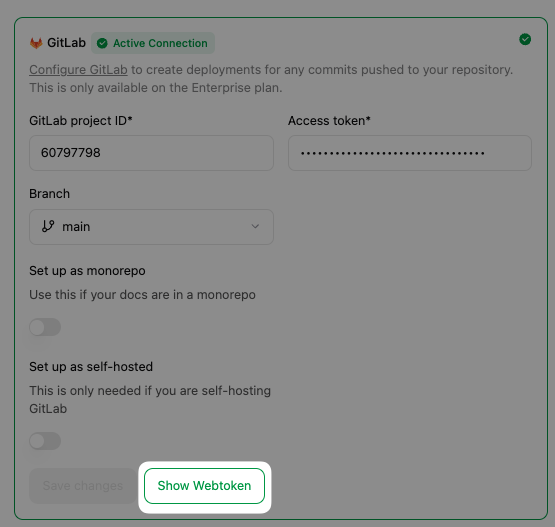
  <Step title="Pega el token">
    Pega el token del webhook generado después de configurar la conexión.

    <Frame>
      <img src="https://mintcdn.com/omer-914cc1c6/1pfjDJXEL6HIHDKE/images/gitlab/gitlab-show-webtoken.png?fit=max&auto=format&n=1pfjDJXEL6HIHDKE&q=85&s=cb400eb4211409dcc24d2360e34fd042" width="555" height="527" data-path="images/gitlab/gitlab-show-webtoken.png" />
    </Frame>
  </Step>

  <Step title="Selecciona eventos">
    Selecciona estos eventos para activar el webhook:

    * **Push events** (All branches)
    * **Merge requests events**

    Cuando termines, debería verse así:

    <Frame>
      <img src="https://mintcdn.com/omer-914cc1c6/1pfjDJXEL6HIHDKE/images/gitlab/gitlab-project-webtoken.png?fit=max&auto=format&n=1pfjDJXEL6HIHDKE&q=85&s=e159b68e98377521ee4661548535cda5" alt="La página de Webhooks en el dashboard de GitLab. Están resaltados los ajustes que se deben configurar para Mintlify." width="1161" height="1740" data-path="images/gitlab/gitlab-project-webtoken.png" />
    </Frame>
  </Step>

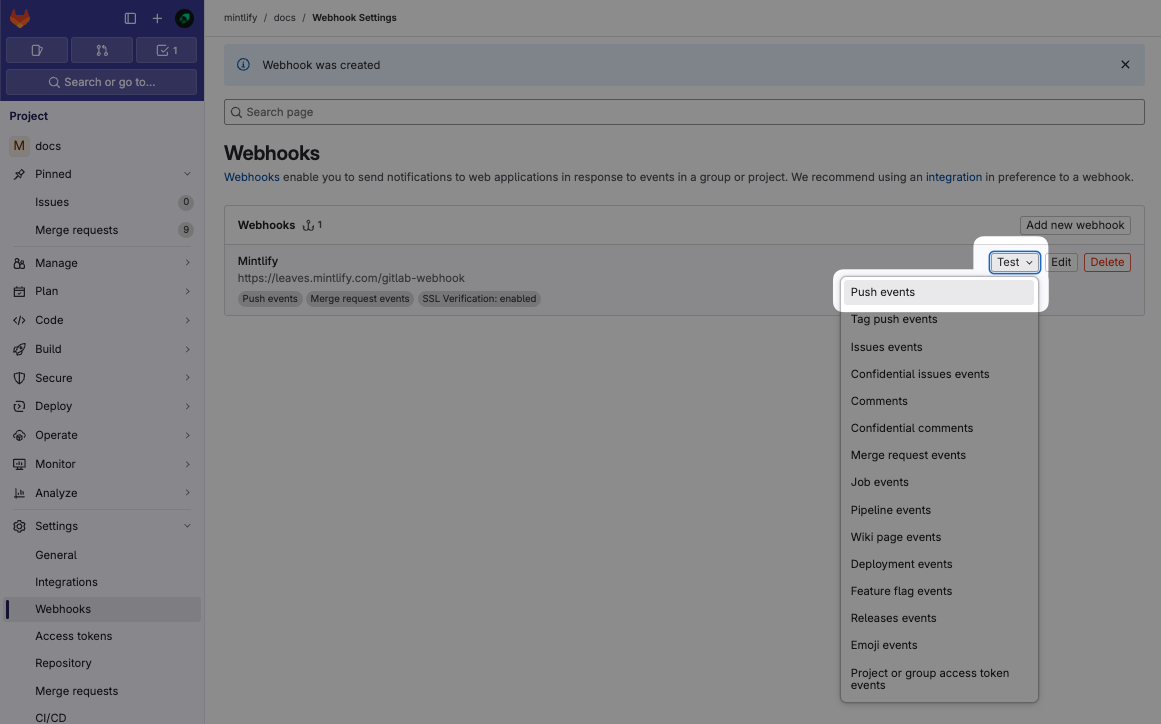
  <Step title="Prueba el webhook">
    Después de crear el webhook, haz clic en el menú desplegable "Test" y selecciona "Push events" para enviar un payload de prueba y comprobar que está configurado correctamente. Verás "Hook executed successfully: HTTP 200" si está configurado correctamente.

    Esto te ayudará a verificar que todo funciona bien y que tu documentación se sincronizará correctamente con tu repositorio de GitLab.
    <Frame>
      <img src="https://mintcdn.com/omer-914cc1c6/1pfjDJXEL6HIHDKE/images/gitlab/gitlab-project-webtoken-test.png?fit=max&auto=format&n=1pfjDJXEL6HIHDKE&q=85&s=d3b84f35a286d0d32f7555de944da001" width="1161" height="724" data-path="images/gitlab/gitlab-project-webtoken-test.png" />
    </Frame>
  </Step>
</Steps>